
Installation Guide

Installation Guide
! WARNING - Turn off the power at the breaker box before starting any work.
Failure to do so can result in bodily harm.
We strongly recommend that a licensed electrician performs the installation.
Ensure that all safety and jurisdiction code is followed up to the highest standard.
Warranty Effective
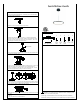
Parts component list
1x
1
Allen key 2.0mm
2x +
1 extra
1 1/8"
2 3 4 5
2x +
1 extra
3/4"
2x +
1 extra
1 1/8"
2x +
1 extra
6
2x
1/2"
STEP 6
STEP 2
STEP 5
STEP 1
Turn off the power at the breaker box. Test that the power is off at the ceiling
junction box with a circuit tester.
Mark the position of the hanger's holes on your ceiling.
STEP 3
Drill the ceiling holes for the plastic anchors (2).
Install the provided plastic
anchors into the holes you've just drilled. Mount the hanger with the 4 screws
provided. The 3/4" screws (3) are screwed into your junction box. The 1 1/8"
screws (4) are screwed into your plastic anchors.
Connect the power and neutral wires using the provided wire caps. Connect the
white wire from the fixture to the neutral wire in your ceiling junction box.
Connect the black wire to the power wire in your ceiling junction box. Connect
the bare copper ground wire to the green screw on the hanger.
Mount the fixture ceiling canopy to the hanger using the provided 1/2" screws (6)
as shown.
STEP 8
Turn your power back on at the breaker box.
STEP 7
Push the lock nuts up to release the lines and pull through accordingly. Release
once your height is set and tighten the hex screw with the allen key on the inside
of the canopy to lock the nut and keep the lines in place.
1
2
2
3
3
4 4
1
5
5
6 6
STEP 4
There is a break point on the light's pole. To connect the pole, thread the metal
extension into the fixture collar.
BREAK POINT