
Operation Manual


11
- Mit Hilfe des Fahrzeugschlüssels die linke Tür verschließen.
Die rechte Tür sowie die hinteren Türen (bei 4 türigen Fahr-
zeugen) müssen sich dabei über den Stellmotor mit verschlie-
ßen.
- Prüfung an der rechten Tür wiederholen.
- Lock the door with the vehicle key.
The right door and the rear doors (in the case of 4-doors
vehicles) should then be locked through the servomotor.
- Repeat the control with the right door.
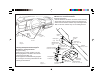
Abb. 13
Diagram 13
bl = blau
gr = grün
br = braun
w = weiß
sc = schwarz
ro = rot
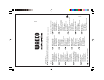
Electrical connection external control
1 = + 12 V - red
2 = control cable CL "close" - brown
3 = motor cable CL "open" - blue
4 = exeternal control +12V = ZV "open"
5 = exeternal control GND (-) = ZV "open"
6 = GND - black
7 = control cable CL "close" - withe
8 = motor cable CL "close" - green
9 = exeternal control +12V = ZV "close"
10 = exeternal control GND (-) = ZV "close"
Ansclüsse Steuerrelias
1 = +12 V - rot
2 = Steuerleitung ZV "zu" - braun
3 = Motorleitung ZV "auf" - blau
4 = Ext. Steuerung + 12V = ZV "auf"
5 = Ext. Steuerung - 12V = ZV "auf"
6 = -12 V - schwarz
7 = Steuerleitung ZV "auf" - weiß
8 = Motorleitung ZV "zu" - grün
9 = Ext. Steuerung + 12V = ZV "zu"
10 = Ext. Steuerung - 12V = ZV "zu"
bl
gr
gr
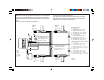
Stellmotor
vorne
Servo motor
front
Stellmotor
hinten
Servo motor
rear
Stellmotor
hinten
Servo motor
rear
Stellmotor
vorne
Servo motor
front
Schaltplan bei Verwendung
von ML44GO3 (4 türig)
Wiring diagram for use of
ML44GO3 (4-doors)
Schaltplan bei Verwendung
von ML22GO3 (2 türig)
Wiring diagram for use of
ML22GO3 (2-doors)
gr
bl
bl
gr
bl