Owner’s Manual Read this manual for complete instructions Français (page 21) / Español (página 41) Power Painter / Stainer Plus Power Painter Max Power Painter Pro Contents 2 4 5 6 7 8 9 11 12 13 14 17 18 20 61 62 64 Important Safety Information Before You Begin Features Cup Mode Setup Remote Suction Hoses Setup Backpack Kit Setup Spray Controls Priming with the Remote Suction Hoses Practice Spraying Spraying Technique Cleanup Reassembly / Maintenance Troubleshooting Replacement Parts Repacking Diagram
Important Safety Information Read all safety information before operating the equipment. Save these instructions. Indicates a hazardous situation which, if not avoided, could result in death or serious injury. To reduce the risks of fire or explosion, electrical shock and the injury to persons, read and understand all instructions included in this manual. Be familiar with the controls and proper usage of the equipment. Grounding Instructions This product must be grounded.
Important Safety Information WARNING - To reduce the risk of skin injection: 1. Do not aim the gun at, or spray any person or animal. 2. Keep hands and other body parts away from the discharge. For example, do not try to stop leaks with any part of the body. 3. Always use the nozzle tip guard. Do not spray without the nozzle tip guard in place. 4. Only use a nozzle tip specified by the manufacturer. 5. Use caution when cleaning and changing nozzle tips. 6.
Before you Begin This page contains information that is necessary in order to operate the sprayer properly. Material Preparation: • It is important to mix the material thoroughly before you begin. Do not shake the material to mix it. Always stir the material gently but thoroughly before use. • Remove any skin that has formed on the top of the material. Do not mix the skin into the material. The skin can break up and clog the sprayer. Older materials may need to be strained.
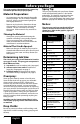
Features Note: Some of the graphics in this manual may not exactly match your sprayer. All information and instructions given in this manual applies to all models except where noted. Power Painter / Stainer Plus a a2 i-k Power Painter Pro h a a1 a2 a1 g g c d b d e f l Power Painter Max a a2 h m a1 p g c o j-k d n f © Wagner Spray Tech.
Cup Mode Setup Recommended for small to medium jobs The cup will give you approximately 3-5 minutes of continuous spraying time depending upon the cup size. iMPORTANT: Avoid running the cup dry. An empty cup will allow air to become sucked into the sprayer, which leads to globbing and spitting. 1 IMPORTANT: Always make sure the tip nut is tightened securely prior to spraying. or 2 Cup Mode Setup: 1. 2. 3. 4. Remove the cup - Press and hold cup release button. Turn cup to release. Remove cup.
Remote Suction Hose Setup (optional) Recommended for medium to large jobs A 75% duty cycle is recommended when spraying with the remote suction hoses. For example, trigger the gun for 15 seconds, and then allow the gun to remain idle (untriggered) for 5 seconds. iMPORTANT: Avoid running the container dry. An empty container will allow air to get sucked into the sprayer, which leads to globbing and spitting. 1 IMPORTANT: Always make sure the tip nut is tightened securely prior to spraying.
Backpack Kit Setup (optional) Recommended for medium to large jobs A 75% duty cycle is recommended when spraying with the remote suction hoses. For example, trigger the gun for 15 seconds, and then allow the gun to remain idle (untriggered) for 5 seconds. 1 (a) iMPORTANT: Avoid running the backpack dry. An empty backpack will allow air to get sucked into the sprayer, which leads to globbing and spitting. (b) 2 IMPORTANT: Always make sure the tip nut is tightened securely prior to spraying.
Spray Controls (Plus / Max) The spray controls vary depending upon the model of sprayer you have. Refer to this page in order to learn about the controls of your particular sprayer. Power Painter / Stainer Plus Material Select Lever: Refer to the information given in the previous column. Electronic Speed Control: Material Select Lever: The spray pattern is controlled by the Material Select Lever on the rear of the sprayer, and by the thickness of the material being sprayed.
Spray Controls (Pro) Power Painter Pro Electronic Material Selector: The spray pattern is controlled by the Electronic Material Selector (a) and by the thickness of the material. If you are spraying thicker materials such as latex paint, press the ‘Select’ button (b) until the indicator light indicates ‘paint’. If you are spraying thinner materials such as thinner stains, press the ‘Select’ button (b) until the indicator light indicates ‘STAIN’.
Priming with the Remote Suction Hoses Follow these steps if you plan to spray while using the remote suction hoses or the backpack kit. • The time needed to prime will vary from 30 seconds to 3 minutes depending upon the thickness of the material you are spraying. • If your sprayer is properly cleaned and oiled and it takes longer than three minutes to prime, your piston and/or pump housing may be worn and will need to be replaced before using your remote suction set.
Practice Spraying You will need: 1 • a scrap piece of wood or cardboard Important - read before spraying PAINT Priming the Sprayer or Once you are ready to spray, it may take 20 seconds for material to spray after you pull the trigger. The sprayer may sound choppy, while at the same time spit or spray large globs briefly prior to the spray coming out in a fine mist. This is normal. Keep holding the trigger and material will come from the sprayer in a fine mist. Practice Spraying: 1.
Spraying Technique Adjusting the spray tip assembly: The adjustable spray tip assembly produces a pattern that can be adjusted horizontally or vertically. Rotate the spray adjustment guard (b) as shown. To prevent an injection hazard, make sure the sprayer is unplugged before you adjust the spray tip. Make sure the spray tip nut (a) is sufficiently hand tightened prior to spraying.
Cleanup (cup mode) You will need: • • • • Waste container Cleaner nozzle and lubricant Warm soapy water if you sprayed latex materials Mineral spirits if you sprayed oil-based materials 1 Make sure you clean the sprayer in a wellventilated area whenever cleaning with flammable solvents. The sprayer contains electrical parts. Do not submerge the sprayer into any liquids. 2 Cleanup (cup mode): 1. Unplug the sprayer. Pour the remaining material back into the original container.
Cleanup (cup mode) 8. Clean all parts thoroughly with the brush provided using a solution appropriate to the type of material you sprayed. 8 9. important: Make sure to completely remove all material from the inside of the piston chamber by scrubbing with the brush. Even a small amount of material can dry like glue and keep the piston from moving, causing damage to the sprayer. 10.
Cleanup (remote suction hoses / backpack kit) You will need: • • • • Waste container Cleaner nozzle Warm soapy water if you sprayed latex materials Mineral spirits if you sprayed oil-based materials 1 Make sure you clean the sprayer in a wellventilated area whenever cleaning with flammable solvents. The sprayer contains electrical parts. Do not submerge the sprayer into any liquids. 2 Cleanup (remote suction hoses / backpack kit): 1. Unplug the sprayer.
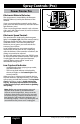
Reassembly / Maintenance You will need: • Scrap piece of wood or cardboard • Lubricant 1 Note: Power Painter Max only - Refer to page 61 to see the proper way to repack the sprayer and components ito the carrying case. 1. Slide the spring onto the front end of the piston. Insert the piston into the back of the pump housing. 2. Insert the pump housing assembly into the front of the sprayer. 3. Place the locking nut onto the pump housing. Press in while turning the locking nut clockwise.
Troubleshooting Any attempt to open the motor housing or repair any electrical parts within the unit by anyone other than an authorized repair technician could cause serious injury and will void the warranty. PROBLEM CAUSE SOLUTION Problem A: Motor will not run 1. No power at wall outlet. Electrical problem or defective motor. 1. Try new wall outlet. Take to Authorized Service Center for repair. Problem B: Motor has a low hum and does not spray 1. Seized piston 1.
Troubleshooting PROBLEM CAUSE SOLUTION Problem E: Excessive fogging 1. Material selector set too high 2. Holding sprayer too far from work surface 1. Set material selector to ‘stain’ 2. Hold sprayer closer to work surface Problem F: Runs and sags in paint 1. Arm movement too slow, holding spray gun too close or work surface, or applying too much paint at one time 1. See section on spraying (page 13) Problem G: Material drips from spray tip or guard 1. Guard is for safety and cannot be removed.
Replacement Parts Notice: Parts of your sprayer wear out with use and require regular replacement. They include the atomizer valve, piston and spring. These parts are not covered by your sprayer warranty. More abrasive materials such as latex paints and stains cause these parts to wear out faster than less abrasive materials such as oil-based paints and stains, thin stains and sealers. Atomizer valve: The atomizer valve is shaped to cause the material to spin as it comes out of the sprayer.
Repacking diagram • Schéma de remballage • Diagrama para volver a embalar Power Painter Max only Follow the diagram below in order to properly fit the sprayer and components into the carrying case. Power Painter Max uniquement Suivre le schéma ci-dessous afin de replacer correctement le pulvérisateur et ses pièces dans le boîtier de transport. Solo dispositivo Power Painter Max Siga el siguiente diagrama para ajustar adecuadamente el pulverizador y los componentes en el estuche.
Parts List • Liste de pièces • Lista de piezas (a) (b) (c) (d) (e) (f) (g) (i) (*) (j) (*) (h) (s) (*) (r1) (*) (*) (r2) (k) (l) (m) (q) (o) (*) (*) (n) (p) (q1) 62 English Français Español © Wagner Spray Tech - All Rights Reserved
Parts List • Liste de pièces • Lista de piezas Item Art. Ar. Part No. Nº de piéce Pieza No. a) ---------- English Description Français Description Español Descripción Sprayer assembly Pulvérisateur Rociador Qty. Qte. Cant.
WAGNER ONE-YEAR LIMITED WARRANTY - Keep on File This product, manufactured by Wagner Spray Tech Corporation (Wagner) is warranted against defects in material and workmanship for one year following date of purchase if operated in accordance with Wagner’s printed recommendations and instructions. This warranty does not cover damage resulting from improper use, accidents, user’s negligence or normal wear.