Owner’s Manual Read this manual for complete instructions Français (page 17) / Español (página 33) PaintREADY™ System Contents 2 4 5 6/7 8 9 10 12 14 15 16 49 52 Important Safety Information Controls and Functions Material Preparation Assembly Air and Material Controls Spray Pattern Adjustment Proper Spraying Technique Cleanup Reassembly Maintenance Troubleshooting Parts List Warranty 0416 • Form No.
Important Safety Information Read all safety information before operating the equipment. Save these instructions. Indicates a hazardous situation which, if not avoided, could result in death or serious injury. To reduce the risks of fire or explosion, electrical shock and the injury to persons, read and understand all instructions included in this manual. Be familiar with the controls and proper usage of the equipment. Grounding Instructions This product must be grounded.
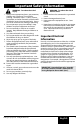
Important Safety Information WARNING - To reduce the risk of injury: 1. Always wear appropriate gloves, eye protection, clothing and a respirator or mask when painting. Hazardous vapors – Paints, solvents, insecticides, and other materials can be harmful if inhaled or come in contact with body. Vapors can cause severe nausea, fainting or poisoning. 2. Do not operate or spray near children. Keep children away from equipment at all times. 3. Do not overreach or stand on an unstable support.
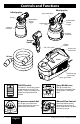
Controls and Functions White Spray Gun Yellow Spray Gun Spray width lever Air cap Material flow control Trigger Material flow control Trigger Adjustment ring Material container Material container Spray gun handle Turbine handle ON / OFF switch Air pressure control dial Air hose Turbine Filter housing (both sides) Spray gun holder ON/OFF switch: The ON/OFF switch turns power to the turbine on and off. The ON/OFF switch is located on top of the carrying handle of the turbine.
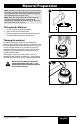
Material Preparation Note: Material to be sprayed may need to be strained to remove any impurities in the paint which may enter and clog the system. Impurities in the paint will give poor performance and a poor finish. Note: Only thin the material if absolutely necessary to improve spray performance. Optimal spray performance should be acheived simply by adjusting the various controls on the unit. 1 To Prepare the Material: 1. Stir the spraying material thoroughly. 2. Unscrew the cup from the nozzle. 3.
Assembly Before you begin: NEVER point the spray gun at any part of the body. 1 Note: Your unit includes two spray guns. See below to determine the correct spray gun for your spraying project. Yellow spray gun - designed for spraying thinner materials, such as oil-based stains and thinned paints. The yellow spray gun leaves a smooth finish. White spray gun - designed for spraying thicker materials, such as latex paints and stains.
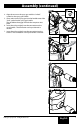
Assembly (continued) 4 4. Align the arrow on the spray gun with the “unlock” symbol on the spray gun handle. 5. Insert and twist the spray gun into the handle toward the “lock” symbol on the spray gun handle. The tab below the trigger will lock the two pieces into place. 6. Insert the air hose tightly into the connection on the spray handle. The connection can be positioned as desired. 7. Insert the air hose tightly into the connection into the turbine. The connections can be positioned as desired.
Air and Material Controls Spray performance will depend upon a number of factors: material thickness, spray pattern selected, material volume, and air pressure. With any type of air-assisted spraying, desired spray results will be achieved through some trial and error while adjusting some or all of these variables. Review these pages to learn about the spray controls and how they can be used to acheive the desired spray results.
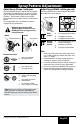
Spray Pattern Adjustment Adjust Spray Shape - both guns The spray pattern shape is adjusted by turning the adjustment ring (white gun) or air cap ears (yellow gun) to either the vertical, horizontal, or diagonal positions. The positions of the air cap and the corresponding spray pattern shapes are illustrated below. Test each pattern and use whichever pattern is suitable for your application.
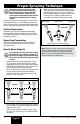
Proper Spraying Technique The room you are spraying must be STOP properly masked in order to prevent overspray from covering woodwork, floors or furnishings. Make sure you have properly masked the room per the instructions on the enclosed “Taping Guide”. If spraying with an air-assisted spray system is new or unfamiliar to you, it is advisable to practice on a piece of scrap wood or cardboard before beginning on your intended workpiece and/or test with water.
Proper Spraying Technique Pattern Examples Use the images and guidelines below in order to assist you in achieving the desired spray pattern for your project. These are meant to be general starting points - you may have to slightly modify certain controls on the system in order to get the exact performance you need. Large Surface Projects Generally, high material flow and air power are needed for spraying large surface areas, such as walls and decks.
Cleanup Flushing the unit Before you begin: When cleaning, use the appropriate cleaning solution (warm, soapy water for latex materials; mineral spirits for oil-based materials) important: Never clean air cap or air holes in the nozzle with sharp metal objects. Do not use solvents or lubricants containing silicone. 1 Special cleanup instructions for use with flammable solvents (must have a flashpoint above 100ºF (38ºC): • • • • 1/2 Always flush spray gun outside. Area must be free of flammable vapors.
Cleanup (continued) Cleaning the Gun 1 To Clean the Spray Gun: 1. Make sure power cord is unplugged. Remove the air hose from the rear of the spray gun handle. 2. White gun only a. Remove the adjustment ring (a) carefully from the connecting nut (b). Loosen the connecting nut. b. Remove the parts as shown. Clean all parts with a cleaning brush and the appropriate cleaning solution. c. Clean the air vent (c) on the suction tube with a soft bristled cleaning brush.
Reassembly To Reassemble: 1. Insert the nozzle (1). Make sure to align the groove (a) and notch (b) and align the nozzle opening with the needle. Note: Make sure the red nozzle seal is in place. Replace if it falls out and is undamaged. Make sure the cup side of the seal (the side with the groove) is facing out (c). 2. Put the air screen (d) in the air cap (e). Put both (2) on the nozzle (1) and secure with the connecting nut (3). Note: This step is easier if the nozzle is facing up. 3.
Maintenance Cleaning the Filters: important: Before every use, you should inspect the air filters in the turbine to see if it is excessively dirty. If it is dirty, follow these steps to replace it. important: Never operate your unit without the air filters. Dirt could be sucked in and interfere with the function of the unit. 1. Press the tabs on each side of the turbine to remove the filter covers. 2. Remove the dirty filters from the turbine and replace with new ones.
Troubleshooting PROBLEM CAUSE SOLUTION Problem A: Little or no material flow 1. 2. 3. 4. 1. 2. 3. 4. Nozzle clogged. Suction tube clogged. Material flow setting too low. Suction tube loose. 5. Air vent on suction tube blocked. 6. No pressure build up in container. 7. Air valve tube disconnected. 5. 6. 7. 8. Air filter clogged. 9. Spray material too thick. 8. 9. Clean. Clean. Increase material flow setting. Remove and replace as tightly as possible. Clean (see page 15) Tighten container.
Parts List • Liste de pièces • Lista de piezas Replacement parts available by calling customer service On peut obtenir des pièces de rechange en appelant le Service à la clientèle. Los repuestos están disponibles llamanado al servicio a clientes. 1-800-328-8251 1 4 2 3 5 Manufacturing Code Location Emplacement du code de fabrication Ubicación del código de fábrica # Part No. Nº de piéce Pieza No.
Parts List • Liste de pièces • Lista de piezas White spray gun • Pistola blanc • Pistola blanco 1 2 3 4 5 6 10 8 9 7 8 # 1 Part No. Nº de piéce Pieza No. 0529014 2 -------- 3* 2350167 English Description Français Description Español Descripción Spray gun assembly (includes items 1-10) Ensemble de pistolet (inclut des pièces 1 à 10) Ensamblaje de pistola (incluye los articulos 1-10) Qty. Qte. Cant.
Parts List • Liste de pièces • Lista de piezas Yellow spray gun • Pistola jaune • Pistola amarillo Replacement parts available by calling customer service On peut obtenir des pièces de rechange en appelant le Service à la clientèle. 1 Los repuestos están disponibles llamanado al servicio a clientes. 1-800-328-8251 2 4 3 5 8 6 7 # Part No. Nº de piéce Pieza No. 1 0417700A 2 0414353 English Description Français Description Español Descripción Qty. Qte. Cant.
Limited Warranty - HVLP paint spray equipment Garantie limitée - Pulvérisateur de peinture HVLP Cet article fabriqué par Wagner Spray Tech This product, manufactured by Wagner Spray Tech Corporation (Wagner) est garanti contre tout défaut Corporation (Wagner), is warranted against defects de fabrication et de matériaux pour une période in material and work-manship for one year following d’un an suivant la date d’achat, à condition qu’il soit date of purchase if operated in accordance with utilisé conforméme