
User Guide

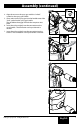


English
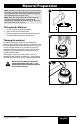
© Wagner Spray Tech - All Rights Reserved 9
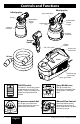
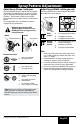
Spray Pattern Adjustment
Adjust Spray Shape - both guns
The spray pattern shape is adjusted by turning the
adjustment ring (white gun) or air cap ears (yellow
gun) to either the vertical, horizontal, or diagonal
positions. The positions of the air cap and the
corresponding spray pattern shapes are illustrated
below.
Test each pattern and use whichever pattern is
suitable for your application.
NEVER trigger the gun while
adjusting the ears on the air cap.
NEVER point the spray gun at any
part of the body.
YellowWhite
Adjustment ring
Air cap ears
Horizontal pattern
=
=
=
Use ‘up and down’
spraying motion
Vertical pattern
=
=
=
Use ‘side to side’
spraying motion
Diagonal pattern*
=
=
=
Use ‘up and down’ or
‘side to side’ spraying
motion
Use lower air power /
material ow
For coating smaller
areas, corners and edges
*Note: The air cap can be set diagonally on the
yellow gun only. To achieve a round pattern
with the white gun, see the “Adjust Spray Width”
section.
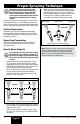
Adjust Spray Width - white gun only
The spray width lever on the white gun determines
the width of the spray pattern.
Spray width lever
Wide
pattern
For coating large surfaces
Use higher air power
Use higher material ow
Narrow
(round)
pattern
For coating smaller areas,
corners and edges
Use lower air power
Use lower material ow
Tips:
1. Start with a fan pattern for painting trim work
(1-5” width) and larger surfaces like doors and
walls (>5” width).
2. Adjust Material & Air Flow settings based on
coating, fan pattern width, and nozzle.
3. Fine tune the Material and Air Power settings to
achieve the best results for your application.
4. Use narrow pattern for detailed work, touch up.
5. Recommended settings for Material and Air
Power may change if the coating is thinned.