SMART SideKick ™ Multi-Room Powered Roller for Continuous Painting Owner’s Manual Read this manual for complete instructions Quick-Start Guide 1 2 3 Read all warnings! Secure container to pump Insert suction tube 4 5 6 Attach the roller arm Plug in, turn switch on (l) Press and release to start Contents 2/3 4/5 6/7 8/9 10 / 11 12 13 14 43 44 Important Safety Information Parts and Components Setup Practice / Usage Cleanup Storage / Maintenance Troubleshooting Warranty Parts List Optional
Important Safety Information Read all safety information before operating the equipment. Save these instructions. Indicates a hazardous situation which, if not avoided, could result in death or serious injury. To reduce the risks of fire or explosion, electrical shock and the injury to persons, read and understand all instructions included in this manual. Be familiar with the controls and proper usage of the equipment.
Important Safety Information Grounding Instructions This product must be grounded. In the event of an electrical short circuit, grounding reduces the risk of electric shock by providing an escape wire for the electric current. This product is equipped with a cord having a grounding wire with an appropriate grounding plug. The plug must be plugged into an outlet that is properly installed and grounded in accordance with all local codes and ordinances.
Parts and Components a c b d e f ** g h i l j k e k1 k2 k3 4 English © Wagner Spray Tech - All Rights Reserved
Parts and Components Note: Some of the parts listed on this page can be replaced by calling technical service. See page 43 for part numbers. Note: Some parts are not assembled out of the box. See “Setup” section, page 6-7.
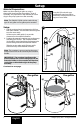
Setup Material Preparation: Make sure the material you plan on using is thoroughly stirred and free from debris. Strain if necessary. Any impurities in the material can cause clogs in the pump system or roller assembly. Scan this QR code with your mobile device and you will be directed to a video on how to set up your Power Roller. Note: The SideKick™ Roller can be used with any type of one-gallon or five-gallon paint container. Setup: 1.
Setup (continued) 3. If using a five-gallon container, insert the small end of the extension into the suction tube. 4. Place the suction tube back into position in the suction tube guide. Make sure the tube (or the extension) reaches the bottom of the material container. 5. Press the quick-release tabs on the handle and attach the roller arm assembly to the handle. 6.
Practice / Usage Scan this QR code with your mobile device and you will be directed to a video on Practice and Usage tips. IMPORTANT: Make sure your floors and furnishings are covered with drop cloths during usage. Break Periods During break periods, the handle assembly should be placed flat with the roller sitting on a clean piece of cardboard or on top of the container. • During break periods, make sure that the roller is not saturated with paint, or it will drip and accumulate.
Practice / Usage Prepping the Room Remove all pictures, mirrors, and decorations from the walls and draperies from the windows. Remove all nails, hardware and switch and receptacle covers. Cover furniture and floor with drop cloths. Surface Preparation • Always remove wallpaper before painting. Wash off old adhesive and rinse with water. Allow the walls to dry before painting. • Wash and rinse dirt, grease and oil build-up off the walls with soap and water.
Cleanup Scan this QR code with your mobile device and you will be directed to a video on Cleanup tips. 1 important: Make sure your floors and furnishings are covered with drop cloths during cleanup.
Cleanup (continued) 5. Remove container from pump. Leave suction tube submerged into the bucket of the appropriate cleaning solution. 6. Hang the roller arm from the bucket. 7. Fully press and release the handle button to run the appropriate cleaning solution through the hoses and roller arm. 5 Note: Allow the pump to circulate the cleaning solution for about 10 minutes. If desired, refill the bucket with new cleaning solution and repeat for another 5 minutes. 8.
Storage / Maintenance You will need: • Petroleum jelly • An old toothbrush or other similar cleaning brush Cleaning and Storage Tips: • Wrap the paint hose around the extension holder and rest the roller arm assembly on the pump underneath the suction tube for easy storage. In addition to thoroughly cleaning your unit after every use, you must clean and lubricate the areas on the roller arm indicated below. Use a thin layer of petroleum jelly to lubricate the indicated areas.
Troubleshooting PROBLEM CAUSE SOLUTION Problem A: The pump will not run. 1. The power cord is unplugged, or no power in outlet. 2. The power switch is turned to 0 (OFF) and handle button has not been pressed. 3. There is a kink in the air hose. 1. Plug the power cord into 120V outlet 2. Turn power switch ON and press handle button. 3. Unkink the air hose. If unit still fails to run, call Customer Service. 4. Call Customer Service. 4. Fluids have entered the handle assembly.
Warranty Wagner one year limited warranty - Keep on file This product, manufactured by Wagner Spray Tech Corporation (Wagner) is warranted against defects in material and workmanship for one year following date of purchase if operated in accordance with Wagner’s printed recommendations and instructions. This warranty does not cover damage resulting from improper use, accidents, user’s negligence or normal wear.
Parts List • Liste de pièces • Lista de piezas 4 1 5 6 2 7 (**) 3 # Part No. Nº de piéce Pieza No. 1 0514118 2 0155206A English Description Français Description Español Descripción Qty. Qte. Cant.
Optional Accessories • Accessoires Optional • Accesorios Opciónal Part No. Nº de piéce Pieza No.