
Product Manual & Warranty


English
12 © Wagner Spray Tech - All Rights Reserved
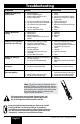
Cleanup
Flushing the unit
Before you begin:
When cleaning, use the appropriate cleaning solution (warm,
soapy water for latex materials; mineral spirits for oil-based
materials)
IMPORTANT: Never clean air cap or air holes in the
nozzle with sharp metal objects. Do not use solvents or
lubricants containing silicone.
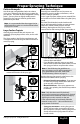
Special cleanup instructions for use with
flammable solvents (must have a flashpoint
above 70ºF (21ºC):
• Alwaysushspraygunoutside.
• Areamustbefreeofammablevapors.
• Cleaningareamustbewell-ventilated.
• Donotsubmergeturbine!
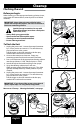
To Flush the Unit:
1. Unplug the power cord. Loosen the material container
by 1/2 turn, but do not remove it. This will relieve any
pressure left over in the system.
Pull the trigger so that the material inside the spray
nozzle drains back into the container.
2. Unscrew the container and remove. Empty any
remaining material back into the material container.
3. Pour a small amount of the appropriate cleaning solution
into the cup (Water=1/2 full. Mineral spirits=1/4 full).
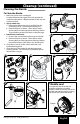
4. Attach the cup to the nozzle and plug in the sprayer.
5. Spray the cleaning solution into a safe area.
While spraying, gently shake the spray gun. This slight
agitation will help break up smaller particles of spray
material.
6. Unplug the power cord. Loosen the material container
by 1/2 turn, but do not remove it. This will relieve any
pressure left over in the system.
Pull the trigger so that the material inside the spray
nozzle drains back into the container.
IMPORTANT: If you cleaned the sprayer using mineral
spirits, repeat steps 1-6 using warm, soapy water.
Move on to “Cleanup - Cleaning the Nozzle”, next page.
2
654
3
1/2
1/2
1
PULL
PULL
Empty waste
container