R High-performance Airless Sprayer Owner’s Manual Need help? Call us first for answers fast. Call Wagner toll-free if you have any comments or problems with this Wagner product. 1-800-880-0993 Wagner Technical Service Visit us on the world wide web! http://www.wagnerspraytech.com 1770 Fernbrook Lane, Minneapolis, MN 55447 © 1999 Wagner Spray Tech Corporation, 1770 Fernbrook Lane, Plymouth, MN 55447 http://www.wagnerspraytech.
SAFETY PRECAUTIONS This manual contains information which must be read and understood before using the equipment. When you come to an area which has one of the following symbols, pay particular attention and make certain to heed the safeguard. • WARNING • This symbol indicates a potential hazard which may cause serious injury or loss of life. Important safety information will follow. • • CAUTION • This symbol indicates a potential hazard to you or to the equipment.
GROUNDING INSTRUCTIONS WARNING This product must be grounded. In the event of an electrical short circuit, grounding reduces the risk of electric shock by providing an escape wire for the electric current. This product is equipped with a cord having a grounding wire with an appropriate grounding plug. The plug must be plugged into an outlet that is properly installed and grounded in accordance with all local codes and ordinances.
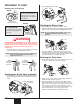
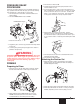
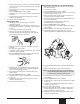
PREPARING TO PAINT Pusher Valve Button (optional) Attaching the Tip to the Gun GX-07 Gun model GX-07 The gun is secured when the trigger lock is at a 90° angle (perpendicular) to the trigger in either direction. Gun locked (gun will not spray) GX-08 Attaching the Return Hose 1. Be sure that the motor switch is turned to OFF. 2. Screw the brass fitting found in the literature set into the return tube port on the side of the pump and tighten firmly by hand.
3. Turn the motor switch to ON. 4. Increase the pressure by turning the pressure control knob clockwise 1/2 turn. 5. Force the inlet valve to open and close by pushing on it with a screwdriver or the eraser end of a pencil. It should move up and down about 1/16 of an inch. Continue until water or oil is sucked into the sprayer. This will wet the moving parts and break loose any old paint residue.
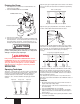
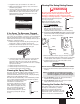
Keep the spray gun at right angles to the surface. This means moving your entire arm back and forth rather than just flexing your wrist. Priming the Pump 1. Turn the pressure control knob counterclockwise to its lowest pressure setting. 2. Turn the PRIME/SPRAY knob to PRIME. Even coat throughout PRIME/SPRAY Knob Approximately 10 to 12 inches Keep stroke smooth and at an even speed.
6. Trigger the spray gun to bleed air out of the hose. 7. When paint reaches the spray tip, spray a test area to check the spray pattern. 8. Use the lowest pressure setting necessary to get a good spray pattern. If the pressure is set too high, the spray pattern will be too light. If the pressure is set too low, tailing will appear or the paint will spatter out in gobs rather than in a fine spray.
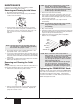
Long-term Storage CLEAN UP Overnight Storage WARNING Shutdown Do not allow paint to build up on the motor or the motor will overheat. Do not allow flammable solvents to come in contact with the motor or they could ignite. 1. Lock the gun by turning the gun trigger lock parallel with the gun body. 2. Turn the pressure control knob counterclockwise to the minimum setting. 3. Turn the PRIME/SPRAY knob to PRIME. 4. Turn the motor switch to OFF and unplug the sprayer. 5.
5. Change to clean water or solvent and continue circulating for another 5 minutes to thoroughly clean the hose, pump and spray gun. 6. Turn the pressure control knob counterclockwise to its lowest setting. 7. Turn the PRIME/SPRAY knob to PRIME. 8. Trigger the gun to remove any pressure which may still be in the hose. 9. Lock the gun by turning the gun trigger lock so that it is parallel to the gun body. 10. Turn the motor switch to OFF. Preparing the Sprayer for Long-term Storage 1.
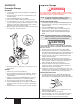
MAINTENANCE NOTE: This spring is manufactured to a very specific tension. Do not put in an unauthorized substitute. See the paint pump assembly parts diagram for the proper replacement part number. An extra spring is included in the lit set. Follow these procedures when encountering problems indicated in the troubleshooting section. Removing and Cleaning the Inlet Valves 1. Be certain that the sprayer is off. 2. Remove the inlet valve assembly using a 27 millimeter socket or box end wrench. 3.
TROUBLESHOOTING Problem The sprayer does not start up. Cause Solution 1. The sprayer is not plugged in. 2. The ON/OFF switch is set to OFF. 3. A fuse is blown in the sprayer. 4. Low or no voltage is coming from the wall plug. 5. The sprayer was turned off while still under pressure. 6. The extension cord is damaged or has too low a capacity. 7. The thermal overload on the sprayer is tripped. 8. There is a problem with the motor.