Item #: BWTOD Assembly Instructions For our most current instructions, to request missing, lost or broken parts, or for any other Customer Service issues, please visit our website at www.walkeredison.com or call us at 877-207-5906.
Instruction Manual IMPORTANT INFORMATION READ BEFORE ASSEMBLING THIS PRODUCT Follow the information on the warning labels found on the bunk bed and on the packaging. Do not remove the warning label from the bed. Use only a mattress with the dimensions 74-75 in.L x 37.5-38.5 in.W x 9 in.H on the upper bunk. The surface of the mattress must be at least 5 in. (127mm) below the upper edge of the guardrails. Mattress must not exceed the maximum thickness of 9 in.
Parts List
Wood dowel Barrel nut Connector Large screw Extra-large screw Medium screw Small bolt Large joint connector Large bolt Wrench Small joint connector Small screw Support bracket
Assembly Options Option A Option B (Ladder Right) (Ladder Left) To build this option, follow steps 1 through 10, then 11A through 20A. To build this option, follow steps 1 through 10, then 11B through 20B. Option C This option shows how to separate the bunk bed in order to have two individual beds. Follow steps 21 through 33.
Insert dowels (A) into slats (1,2,3,4,5). Insert dowels (A) into crossbeams (6,7,8,9), guardrails (10,11) and ladder rungs (27,28).
Attach legs (16,17) to slats (1,2) using dowels as guides. Secure legs (16,17) using extra-large screws (E). Attach legs (18,19) to slats (1,2) using dowels as guides. Secure legs (18,19) using extra-large screws (E).
Attach legs (12,13) to slats (3,5) using dowels as guides. Secure slats (5) to legs (12,13) using extra-large screws (E). Insert connectors (C) into of leg (13) and slat (3). Secure slat (3) to legs (12,13) using small joint connectors (L). Note that small joint connectors (L) at leg (13) will go through connector (C). Secure connector (C) at slat (3) using large bolt (J). Attach legs (14,15) to slats (4,5) using dowels as guides. Secure slats (5) to legs (14,15) using extra-large screws (E).
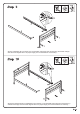
To build the lower ladder assembly, attach ladder rungs (28) to ladder legs (25,26) and secure using large screws (D). To build the upper ladder assembly, attach ladder rungs (27) to ladder side rails (23,24) and secure using large screws (D). Attach lower ladder assembly to upper ladder assembly using small bolts (H).
Secure crossbeams (8,9) to the leg (12,13) assembly using large joint connectors (I) and barrel nuts (B). Note the small diagram above for proper large joint connector/barrel nut assembly. Secure the opposite ends of crossbeams (8,9) to the leg (14,15) assembly using large joint connectors (I) and barrel nuts (B). Note the small diagram above for proper large joint connector/barrel nut assembly.
See P.16-P.20 Attach six of the seven mattress support slats (22) to the lower bunk assembly using medium screws (F). Do not attach the final mattress support slat. It is necessary to attach the ladder to the bed before attaching the final mattress support slat. Attach guardrail supports (20) to crossbeam (6) and front guardrails (11) using small bolts (H). Attach guardrail supports (20) to crossbeam (7) and back guardrails (10) using small bolts (H).
Secure the guardrail assemblies from Step 12A to the leg (18,19) assembly using extra-large screws (E), and large joint connectors (I) with barrel nuts (B). Note the small diagram above for proper large joint connector/barrel nut assembly. Secure the opposite ends of the guardrail assemblies to the leg (16,17) assembly using extra-large screws (E), and large joint connectors (I) with barrel nuts (B). Note the small diagram above for proper large joint connector/barrel nut assembly.
Attach six of the seven mattress support slats (21) to the upper bunk assembly using medium screws (F). Do not attach the final mattress support slat. It is necessary to attach the ladder to the bed before attaching the final mattress support slat. Lift and place the upper bunk assembly onto the lower bunk assembly using connectors (C) as guides.
Secure the upper bunk assembly to the lower bunk assembly using large bolts (J). Attach the ladder to the bed assembly using large screws (D).
Attach the final mattress support slats (21,22) to the upper and lower bunk assemblies using medium screws (F). Secure the ladder to the bed assembly using support bracket (N) and small screws (M).
Attach six of the seven mattress support slats (22) to the lower bunk assembly using medium screws (F). Do not attach the final mattress support slat. It is necessary to attach the ladder to the bed before attaching the final mattress support slat. Attach guardrail supports (20) to crossbeam (6) and front guardrails (11) using small bolts (H). Attach guardrail supports (20) to crossbeam (7) and back guardrails (10) using small bolts (H).
Secure the guardrail assemblies from Step 12B to the leg (18,19) assembly using extra-large screws (E), and large joint connectors (I) with barrel nuts (B). Note the small diagram above for proper large joint connector/barrel nut assembly. Secure the opposite ends of the guardrail assemblies to the leg (16,17) assembly using extra-large screws (E), and large joint connectors (I) with barrel nuts (B). Note the small diagram above for proper large joint connector/barrel nut assembly.
Attach six of the seven mattress support slats (21) to the upper bunk assembly using medium screws (F). Do not attach the final mattress support slat. It is necessary to attach the ladder to the bed before attaching the final mattress support slat. Lift and place the upper bunk assembly onto the lower bunk assembly using connectors (C) as guides.
Secure the upper bunk assembly to the lower bunk assembly using large bolts (J). Attach the ladder to the bed assembly using large screws (D).
Attach the final mattress support slats (21,22) to the upper and lower bunk assemblies using medium screws (F). Secure the ladder to the bed assembly using support bracket (N) and small screws (M).
Loosen medium screws (F) and remove one mattress support slat (21,22) from each bunk. Set aside removed mattress support slats (21,22) to be used in Step 33. Loosen screws (D,M) and remove the ladder from the bed frame. The ladder may be set aside/stored as it is not used in the assembly of the single beds.
Loosen and remove large bolts (J). Lift the upper bunk off the lower bunk.
Loosen large bolts (J) and remove connectors (C) from the bottom bunk assembly. Detach the leg assemblies from the bottom bunk assembly by loosening large joint connectors (I). Detach legs (13,14) and slats (3,4) from the leg assemblies by loosening extra-large screws (E) and small joint connectors (L).
Turn slats (3,4) over so the curve is on top. Attach slat (3) to legs (12,14), and slat (4) to legs (13,15) using small joint connectors (L). Secure slats (5) to the leg assemblies using extra-large screws (E). Attach the leg (12,14) assembly to crossbeams (8,9) using large joint connectors (I) with barrel nuts (B). Note the small diagram above for proper large joint connector/barrel nut assembly.
Attach the leg (13,15) assembly to crossbeams (8,9) using large joint connectors (I) with barrel nuts (B). Note the small diagram above for proper large joint connector/barrel nut assembly. E E E Loosen and remove extra-large screws (E), small bolts (H) and large joint connectors (I) from the upper bunk.
Detach guardrails (10,11) and guardrail supports (20) from the upper bunk. These items may be set aside/stored as they are not used in the assembly of single beds. Attach the leg (18,19) assembly to crossbeams (6,7) using large joint connectors (I) with barrel nuts (B) in the lower set of pre-drilled holes. Note the small diagram above for proper large joint connector/barrel nut assembly.
Attach the leg (16,17) assembly to crossbeams (6,7) using large joint connectors (I) with barrel nuts (B) in the lower set of pre-drilled holes. Note the small diagram above for proper large joint connector/barrel nut assembly. Attach the remaining mattress support slats (21,22) to each bed frame using small screws (F).