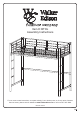
Item #: BTOL Assembly Instructions For our most current instructions, to request missing, lost or broken parts, or for any other Customer Service issues, please visit our website at www.walkeredison.com or call us at 877-207-5906.
Instruction Manual IMPORTANT INFORMATION READ BEFORE ASSEMBLING THIS PRODUCT Follow the information on the warning labels found on the bunk bed and on the packaging. Do not remove the warning label from the bed. Use only a mattress with the dimensions 74-75 in.L x 37.5-38.5 in.W x 9 in.H on the upper bunk. The surface of the mattress must be at least 5 in. (127mm) below the upper edge of the guardrails. Mattress must not exceed the maximum thickness of 9 in.
Parts List
Hardware List Medium bolt 6 pcs Large bolt 8 pcs Small bolt 48 pcs Double-ended bolt 6 pcs Large washer 8 pcs Small washer 34 pcs Angle bracket 2 pcs Plastic plug 4 pcs Plastic tab lock 44 pcs Plastic link 21 pcs Rounded washer 12 pcs Large wrench 1 pc Small wrench 1 pc
1 Attach post (1) to the left side of ladder rungs (7) using double-ended screws (D) and rounded washers (K). Attach ladder rail (6) to the right side of ladder rungs (7) using medium bolts (A) and rounded washers (K). Tighten medium bolts (A) with small wrench (M). 1 3 Attach guardrail (5) and crossbar (8) to post (1) using small bolts (C) and small washers (F). Attach post (3) to guardrail (5) and crossbar (8) using small bolts (C) and small washers (F). Tighten small bolts (C) with small wrench (M).
Secure ladder rail (6) to guardrail (5) using small bolt (C) and small washer (F). Secure ladder rail (6) to crossbar (8) using large bolt (B) and large washer (E). Tighten small washer (F) with small wrench (M) and large bolt (B) with large wrench (L). Attach post (2) to the right side of ladder rungs (7) using double-ended screws (D) and rounded washers (K). Attach ladder rail (6) to the left side of ladder rungs (7) using medium bolts (A) and rounded washers (K).
Attach guardrail (5) and crossbar (8) to post (2) using small bolts (C) and small washers (F). Attach post (4) to guardrail (5) and crossbar (8) using small bolts (C) and small washers (F). Tighten small bolts (C) with small wrench (M). 6 Secure ladder rail (6) to guardrail (5) using small bolt (C) and small washer (F). Secure ladder rail (6) to crossbar (8) using large bolt (B) and large washer (E). Tighten small washer (F) with small wrench (M) and large bolt (B) with large wrench (L).
Attach crossbars (10,11,12) to the assembly from Step 3 using small bolts (C) and small washers (F). Tighten small bolts (C) with small wrench (M).
Attach crossbars (10,11,12) to the assembly from Step 6 using small bolts (C) and small washers (F). Tighten small bolts (C) with small wrench (M).
11 10 Insert mattress support bars (9) into the provided slots of crossbars (10,11). Secure mattress support bars (9) by snapping plastic tab locks (I) into the provided slots of crossbars (10,11). Note that it may be necessary to apply more pressure to some plastic tab locks than others.
J 9 Snap plastic links (J) onto the middle of mattress support bars (9).
3 4 1 2 Attach guardrails (13) to posts (1,2,3,4) using small bolts (C) and small washers (F). Tighten small bolts (C) with small wrench (M).
10 Secure front guardrail (13) to crossbar (10) using large bolts (B) and large washers (E). Secure back guardrail (13) to crossbar (11) using large bolts (B), large washers (E) and, where applicable, angle brackets (G).* Tighten large bolts (B) with large wrench (L). *OPTIONAL: Angle brackets (G) can be used to attach the bed to a wall for additional support. You must use hardware suitable for the particular wall type, which is not included as there are many different wall types.
Screw small bolts (C) and insert plastic plugs (H) into the bunk bed assembly. This will fill the holes that are used only with the optional accessory attachments, which are sold separately.