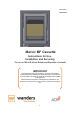
20-12-2011 INK.00.7927 Marvic MF Cassette Instructions for Use, Installation and Servicing For use in GB & IE (Great Britain and Republic of Ireland). IMPORTANT This appliance will become hot whilst in operation, it is therefore recommended that a suitable guard should be used for the protection of young children, the elderly or infirm. Do not attempt to burn rubbish in this appliance. Please read these Instructions carefully before installation or use.
APPLIANCE COMMISSIONING CHECKLIST 4 General Points 5 USER INSTRUCTIONS 6 Using the Appliance for the first time 7 Lighting the appliance 9 Running the appliance 9 Recommended Fuels 10 Ash Removal 12 Burning Tips 13 TECHNICAL SPECIFICATION 14 INSTALLATION INSTRUCTIONS 21 COMMISSIONING 24 MAINTENANCE and SERVICING 25 THE CLEAN AIR ACT AND SMOKE CONTROL AREAS 27 SPARE PARTS 28 WARRANTY 29 2
Dear Client, Congratulations on your new stove, which will be a comfortable source of heat to enjoy for many years on end. When designing this fireplace we took particular care regarding the ease of use, the operational safety and the design. The Marvic is developed and produced at our own factory in Netterden (the Netherlands) and is designed with the technical assistance of ACR heat products ltd Birmingham UK and for the greater part handmade.
APPLIANCE COMMISSIONING CHECKLIST Dealer appliance was purchased from Name: Address: Telephone number: Essential Information - MUST be completed Date installed: Model Description: Serial number: Installation Engineer Company name: Address: Telephone number: Commissioning Checks (to be completed and signed) Is flue system correct for the appliance yes no Flue swept and soundness test complete yes no Smoke test completed on installed appliance yes no Spillage test completed yes no Use of applia
General points 1: Before installation and/or use of this appliance please read these instructions fully and carefully to ensure that you have fully understood their requirements. 2: The appliance must be fitted by a registered installer, or approved by your local building control officer. 3: All local regulations, including those referring to national and European Standards need to be complied with when installing the appliance.
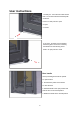
User instructions 1: Primary Air - burns the fuel under the fuel bed. For use with solid fuel and initially with wood fires. Push in to close pull out to open O=open C=closed C O 2: Air wash - air drawn over the window cleans the glass. The source of Primary Combustion air when burning wood. Push in to open pull out to close O C Door handle Use a protected gloved hand to operate.
warning Properly installed, operated and maintained this appliance will not emit fumes into the room. Occasional fumes from de-ashing and refueling may occur. Persistent fume emission is potentially dangerous and must not be tolerated.
Solid fuel To burn smokeless fuels it is required to fit a multi fuel kit. This is fitted by replacing the parts on the bottom of the combustion chamber in the order shown. Burn only anthracite or manufactured briquette smokeless fuels listed as suitable for use with closed heating appliances Do not burn bituminous coal, ‘petro-coke’ or other petroleum based fuels as this will invalidate the product guarantee.
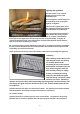
Lighting the appliance For best results set air controls primary air open and air wash completely open Place firelighters and two hands full of dry kindling wood on the grade Light the firelighters, Leave the door slightly open as the fire establishes and the glass warms to avoid buildup of condensation.
You can close the grate by using the tool that is supplied with the stove Close the Primary air control and use the Air wash to control the burn rate when appliance is at operating temperature, Wood burns best on a bed of ash. Burn new logs at high output for a few minutes before adjusting the Air wash control. Refuel little and often for clean, burning. When in use, burning the appliance at high output for a short period also reduces tars and soot.
Burning Solid fuel open the grate by using the tool that is supplied with the stove For best results set air controls primary air open and air wash open Open the Primary air control fully to establish a glowing bed before adding new fuel Burn new fuel at high output for a few minutes before adjusting the primary air control to the desired setting Refuel little and often for clean, efficient burning. Do not burn large amounts of fuel with the Primary Air Control on low settings for long periods of time.
Fuel Quality Solid Fuel Use recommended solid fuels approved for use with closed appliances. Symptoms related to unsuitable fuels include: Difficulty starting and keeping a fire burning well Smoke and small flames Dirty glass and/or fire bricks Short life span for grate and baffles Permanent staining of glass Flue Draught The chimney has two main functions: To safely remove the smoke, gases and fumes from the house. To provide a sufficient amount of draught in the appliance ensuring the fire keeps burning.
Your installer should advise you on possible solutions. If the appliance emits smoke into the room continuously: Close the air controls and allow the appliance to go out Ventilate the room to clear the fumes Leave the room Do not re-light the appliance until the problem is solved. Ash removal Open door. Remove ash pan. Cover it by using the supplied ash pan cover. Remove ash carefully - heat can remain long after use. Do not place hot ash in a bin made from combustible material.
Stove glass blackening This has four possible causes: Incorrect use of Air wash See User Instructions. Burning unseasoned wood See User Instructions Stove operated at too low a temperature Failing to close down the Primary Air Control once the appliance has heated up to this range may cause the appliance to exceed the ideal temperature range and to over-fire. Over-firing can cause permanent damage to the appliance and invalidates your warranty.
Technical specification Nom heat output efficiency CO emission At 13% O² Flue gas temperature Flue gas Mass flow Wood 4,8 kW 78,1% 0,27% 258ºC 4,5 g/s Ancit 4,5 kW 70,8% 0,04% 318ºC 4,1 g/s Distance from combustibles Refuelling interval Shelf 575 mm Side 300 mm Wood Ancit 1h 1h mass of the Marvic 65 kg 15
The flue or chimney system must be in good condition. It must be inspected by a competent person and passed for use with the appliance before installation Products of combustion enteringthe room can cause serious health risks.
The chimney flue must always end up in outlet area 1 (see the drawing and the table below) Roof slope x larger than 23° Roof slope x smaller than23° Height of chimney on the roof at a horizontal distance A measured from the ridge Roof with slope X On the ridge 25o 0.5 30 o 0.5 35 o 0.5 40 o 0.5 45 o 0.5 Horizontal distance A from the ridge, in metres 0.5 m 0.75 0.85 1.0 1.2 1.5 0.75 m 0.85 1.2 1.8 2.4 3.0 1m 1.0 1.6 2.4 3.2 4.0 1.25 m 1.1 2.0 3.0 4.0 5.0 1.5 m 1.2 2.4 3.6 4.8 6.0 2m 1.6 3.2 4.8 6.
The appliance must stand on a non-combustible constructional hearth which is at least 125mm thick with the minimum dimensions as shown in diagram. If it is to be fitted in a raised setting consideration may need to be given to extending the depth of the hearth to safely containing any falling logs or embers. The building must have a suitable load-bearing capacity for the hearth and appliance.
Distance to combustible material All parts of the studwork must be non-combustible for example metal studding. Do not use combustible materials within the dimensions as shown in the diagrams on this page. Fill the space around the appliance not with insulation material. The space built for the appliance must be ventilated to prevent a buildup of heat. If the space is sealed then you must fit vents at both low and high levels of approximately 50cm2 each.
If the appliance is to be fitted with a fire surround, use the minimum clearances see Diagram, between any point of the appliance and any combustible material. If stone, granite, marble or any other natural material is used to construct the fire surround, or any part of it, provision should be made for expansion and movement of the parts due to heating and cooling. All fire surrounds should be suitable for use with solid fuel heating products.
INSTALLATION INSTRUCTIONS Before installation and/or use of this appliance please read these instructions carefully to ensure that all requirements are fully understood. The appliance must be fitted by a registered installer, or approved by your local building control officer. It is very important to understand the requirements of the national Building Regulations and standards, along with any local regulations and working practices that may apply.
4: Remove the trim by pulling it towards the front of the appliance. • Slide the Marvic into the opening • Check the fit of frame before fixing the appliance into position Some installations may require the frame to be fitted before final fixing. • Fix in place using the fixing holes located on the sides and top flangesee diagram.
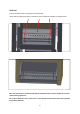
• Connect the flue liner and flue adaptor to the appliance by inserting the flue spigot from the inside of the Marvic • Slide the flue pipe or liner adaptor inside the spigot • Seal the flue to the spigot using fire cement • Seal the spigot to the inside of the Marvic using the 6 screws and fixing ring.
COMMISSIONING To commission: • Replace the firebricks, baffle, and log retainer • Check the door alignment and catch operation, adjust if required • Check the soundness of door seals, castings and joints • Check the operation of the air controls Now carry out a final smoke draw test: • First warm the flue with a blowlamp, or similar, for about 10 minutes • Place a smoke pellet on the centre of the grate, with the air controls open • Close the door Smoke should now be drawn up the flue and be seen to exit fr
• Explain the cleaning and routine maintenance requirements • Explain the requirement to use a suitable fireguard when children, elderly or infirm persons are near the appliance • Record dealer/supplier details and installer details in Instructions • Record serial number in page 4 of Instructions This number is required when ordering spare parts and making warranty claims • Give the copy of the Instructions to the customer MAINTENANCE and SERVICING At the end of the heating season strip, inspect and clean
The Clean Air Act 1993 and Smoke Control Areas Under the Clean Air Act local authorities may declare the whole or part of the district of the authority to be a smoke control area. It is an offence to emit smoke from a chimney of a building, from a furnace or from any fixed boiler if located in a designated smoke control area.
Warranty WANDERS Metaalproducten B.V. in Netterden, the Netherlands, gives a one-year guarantee after the purchase date, provided that the fireplace is properly installed and used in accordance with the instructions in the manual. The guarantee includes all defects which can be reduced to flaws in material and construction, in which case you will receive the new parts free of charge. Labor costs or other expenses are not covered by the guarantee.
Wanders Fires and Stoves Amtweg 4 7077 AL Netterden The Netherlands Tel: 0031 (0)315-386414 Fax: 0031 (0)315-386201 E-mail: info@wanders.nl www.wanders.