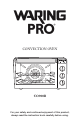
CONVECTION OVEN CO900B For your safety and continued enjoyment of this product, always read the instruction book carefully before using.
IMPORTANT SAFEGUARDS When using electrical appliances, basic safety precautions should always be followed to reduce the risk of fire, electric shock and/or injury to persons, including the following: READ ALL INSTRUCTIONS 1. To protect against risk of electrical shock, do not put appliance in water or other liquid. 2. When using the handle or a knob during the cooking process, do not touch the glass surface. It may be very hot. 3.
13. Do not use this convection oven for anything other than its intended purpose. 14. Extreme caution should be exercised when using containers constructed of the following materials in the oven: paper, cardboard, plastic or similar products. 15. To avoid burns, use extreme caution when removing tray or disposing of hot grease. 16. Do not cover any part of cooking compartment with metal foil, or any part of the oven with metal foil. This will cause overheating of the oven.
CONTENTS Important Safeguards . . . . . . . . . . . . . . . . . . . . . . . . . . . 2 Grounding Instructions . . . . . . . . . . . . . . . . . . . . . . . . . . 5 Introduction . . . . . . . . . . . . . . . . . . . . . . . . . . . . . . . . . . . 6 Parts and Accessories . . . . . . . . . . . . . . . . . . . . . . . . . . . 7 Before Using Your Oven . . . . . . . . . . . . . . . . . . . . . . . . . 11 Function Guidelines . . . . . . . . . . . . . . . . . . . . . . . . . . . . 11 Bake . . . . . . . . .
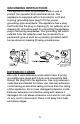
grounding instructions This appliance must be grounded while in use to protect the operator from electrical shock. The appliance is equipped with a 3-conductor cord and 3-prong grounding-type plug to fit the proper grounding-type receptacle. The appliance has a plug that looks like the plug in drawing (1). An adapter, as in drawing (2), should be used for connecting the appliance plug to two-prong receptacles.
INTRODUCTION The Waring Pro® Convection Oven takes countertop cooking to a whole new level. Convection baking uses a hot air fan to circulate heated air, maintaining the selected temperature throughout the oven cavity. This constant flow of air eliminates the hot and cold spots often found in conventional ovens. Because the temperature remains consistent, you can set this oven approximately 25°F lower than a conventional oven when using convection bake, thus saving energy.
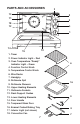
PARTS and accessories 10 2 3 11 5 18 12 4 1 14 13 15 1. Timer 2. Power Indicator Light – Red 3. Oven Temperature “Ready” Indicator Light – Green 4. Function Control Knob 5. Temperature Control Knob 6. Wire Racks 7. Handgrip 8. Rotisserie Spit 9. Rotisserie Skewers 10. Upper Heating Elements 11. Rotisserie Sockets 12. Rack Support Guides 13. Lower Heating Elements 14. Door Handle 15. Tempered Glass Door 16. Enamel Coated Baking Tray 17. Interior Light (not shown) 18.
1. T imer The range of the timer is 120 minutes. The timer setting is optional. You can set the timer either to the desired cooking time or to the OVEN ON position, which will turn the oven on. If the baking time is less than 20 minutes, first turn the timer clockwise past the 20-minute mark and turn it back to the desired time. If a longer time is required, turn the timer directly to the desired time. 2. Power Indicator Light – Red • When the red power indicator light is on, the oven is in operation.
Rotisserie Indicates that the rotisserie motor is operating and the two top heating elements are operating. Rotisserie can be used for poultry, pork, beef filets, lamb and veal. Roast Indicates that the top elements and bottom heating elements as well as the convection fan are operating. This function is used for roasting chicken, pork and steaks. Broil Indicates that the top heating elements are operating.
. U pper Heating Elements There are two straight heating elements in the upper part of the oven. 11. R otisserie Sockets The rotisserie sockets are located on the left and right wall in the center of the oven. 12. Rack Support Guides There are three different levels inside the oven for the toasting rack and baking tray. Select the best position for the food relative to the heating elements. 13.
Before using your oven Before using your oven for the first time, be sure to: •W ash the handgrip, wire racks, baking tray, rotisserie spit and skewers with soapy water, rinse with clear water and dry. These parts should be cleaned and thoroughly dried by hand only. • Use a damp cloth to lightly wipe the inner walls of the oven. Use a small amount of detergent, but don’t use a spray or abrasive polishing agent. Do not touch the electric heating tubes and do not soak the inside of the oven with water.
•S et the temperature knob as specified in reference chart, pages 21–22, or according to your recipe. • Set the timer, if desired, for up to 120 minutes. If the baking time is less than 20 minutes, first turn the timer clockwise past the 20-minute mark and turn it back to the desired time. If a longer baking time is required, turn the timer directly to the desired time. • If not using the timer, set timer to OVEN ON position. • Always use a potholder or oven mitt when removing hot food from the oven.
•S et the timer, if desired. If the baking time is less than 20 minutes, first turn the timer clockwise past the 20-minute mark and turn it back to the desired time. If a longer baking time is required, turn the timer directly to the desired time. If not using the timer set timer to OVEN ON position. • If required to catch drips, place the baking tray one level below the wire rack. The tray and the rack should be set at different levels for satisfactory air convection.
Trussing a chicken There are different methods of trussing but all are basically designed to achieve the same results. Tuck the wings underneath the chicken to secure them. For trussing, use a length of butcher's twine that is approximately 4 or 5 times the length of the chicken. Place the middle of the twine under the tail, bring both sides up and cross over the top of the tail. Wrap ends of the twine around the end of each drumstick and pull to draw the legs together, crossing ends over each other again.
3. Next, install the fixing screws to secure the meat or poultry to the rotisserie spit. 4. Place rotisserie spit with food affixed into cold oven. Note: The ends of the rotisserie spit are marked with L for left side and R for right side of oven. Use this as a guide for inserting into rotisserie sockets. 5. Set the function knob to Rotisserie. 6. Place baking tray (drip pan) on lower shelf to catch the drippings. 7. Set the temperature to 400°F or as specified in recipe. 8. Set the timer, if desired.
• Set the time, if desired. • I f required to catch drips, place the baking tray one level below the toasting rack. The tray and the rack should be set at different levels for satisfactory air convection. •A lways use a potholder or oven mitt when removing hot food from the oven. •S ee Convection/Conventional Oven Cooking Times/Baking Times charts on pages 23-24 for recommended roasting times and oven temperatures. • Please note that the heating elements work in conjunction with the convection fan.
OVEN RACK POSITION DIAGRAM The below diagram illustrates the three rack positions for this convection oven. The bottom position is number 1. BAKEWARE REFERENCE GUIDE The following bakeware is suitable for the .9 cubic foot oven when using one rack (dimensions given in inches): 13 x 9 Rectangle 12 x 7 ⁄2 Rectangle 11 x 7 Rectangle 9 x 13 x 2 6 Muffin 9 x 13 12 Muffin, Traditional 8 x 8 x 2 Cake, Traditional 10 x 5 x 31⁄2 11⁄2 lb. Loaf Pan, Traditional 81⁄2 x 41⁄2 x 23⁄4 1 lb.
TIPS AND HINTS • It is important to rotate any item you are baking in the oven to ensure evenness. • It is recommended to bake one rack at a time. If you do bake with more than one rack, be sure to rotate both the baking trays and their rack positions halfway through bake time. • To ensure even flow of air when using baking tray or other utensils, do not slide tray to the back of oven. Leave about 1 to 2 inches of air space around all sides of each pan for even air circulation.
Beef: oregano, rosemary, thyme, mustard, garlic Lamb: rosemary, garlic Pork: sage, garlic Fish: cilantro, basil, citrus You may not want to use all of the ingredients listed for each category. Experiment – the key is to use ingredients and flavors that appeal to your taste. Brining Brining leaner cuts of meat such as poultry, turkey, and pork in a saltwater solution produces juicier roasts and rotisserie. The difference between brined and non-brined meats is very noticeable.
Finished Cooking Temperatures Always check internal temperature using an instant-read thermometer. Bright red center, lighter pink to outside 130°F Medium Light pink center, brown to outside 160°F Well Done Brown consistently throughout 170°F+ Rare Beef/Lamb The USDA recommends cooking all ground beef to at least Medium (160°F) doneness, or until centers are no longer pink. Pork Always cook until the internal temperature reaches 160°F when tested with an instant-read thermometer.
use and care Always allow the oven to cool completely before cleaning. 1. Always unplug the oven from the electrical outlet. 2. After the oven cools, use a damp cloth or sponge to clean interior and exterior surfaces. 3. Do not soak the inside of the oven or wash it in running water, as this will cause serious damage to the appliance. 4. Do not use any sharp or hard kitchen utensils on the oven since this could damage the surface of the appliance. 5.
Installing and Replacing Oven Light A. Removing the Oven Light Cover Phillips Screw Tab of Oven Light Cover Slot of Oven Light Compartment Oven Light Cover 1. Insert a flat-blade screwdriver into the slot in the thumb screw that holds the oven light cover in place. 2. R otate the screwdriver counterclockwise to remove the screw. 3. Remove the oven light cover. B. Install or Replace the Oven Light 1.
Reference Charts Please keep in mind that the following charts are merely a guideline for baking, roasting, broiling and rotisserie. There are many variables to consider for every individual recipe. Temperatures and baking times may vary accordingly. Our advice is to review your recipe first and then refer to the specific charts. All temperature given are Fahrenheit. suggested broiling times Rack Position Weight or Thickness Approximate Broiling Time (Min.
convection/conveNtional OVEN cooking times Pan Size Recommended Setting Oven Temp (°F) Time (min.
RECIPES Italian-Style Meatloaf Wrapped in Bacon . . . . . . . . . . . 26 Rosemary Chicken With Garlic . . . . . . . . . . . . . . . . . . . 27 Hoisin-Glazed Cornish Hens . . . . . . . . . . . . . . . . . . . . . 28 Rotisserie Pork Loin With Sage-Garlic Rub . . . . . . . . . 29 Rotisserie Garlic Eye Round . . . . . . . . . . . . . . . . . . . . . 30 Cod With Ginger Lime Crust . . . . . . . . . . . . . . . . . . . . . 32 Salmon With Honey Soy Glaze . . . . . . . . . . . . . . . . . . .
ITALIAN-STYLE MEATLOAF WRAPPED IN BACON Serves 8–10 2 pounds meatloaf mix, equal amounts of ground beef, pork, and veal 1 tablespoon finely chopped garlic 1 ⁄2 cup chopped fresh parsley 2 cups seasoned bread crumbs 1 cup marinara sauce 2 eggs 3 ⁄4 cup shredded mozzarella 3 ⁄4 cup grated Parmigiano–Reggiano 1 ⁄4 teaspoon crushed red pepper 4 strips center cut bacon Preheat oven to 375°F on convection bake, with rack in position 1 (bottom position).
rosemary chicken with garlic Serves 2–3 1 3–31⁄2 pound chicken, rinsed and patted dry 1 lemon, cut in half (for roasting chicken, not rotisserie) 2 sprigs rosemary 2 garlic cloves, smashed 3 ⁄4 teaspoon kosher salt 1 ⁄2 teaspoon crushed black pepper 1 tablespoon olive oil butcher’s twine if using rotisserie function If roasting chicken, preheat oven to 375˚F on convection bake with rack in position 1 or 2. Squeeze lemon all over outside and inside chicken.
chicken the last 15 minutes of cooking time using the juices from the drip pan. Nutritional information per serving: Calories 603 (64% from fat) • carb. 5g • pro. 52g • fat 46g sat. fat 13g • chol. 207mg • sod. 529mg • calc.
Carefully remove rotisserie spit using the hand grip. Serve with steamed rice. *The hoisin marinade is very versatile; brush it on salmon fillets and broil for about 15 minutes for an easy meal. Nutritional information per serving: Calories 594 (30% from fat) • carb. 49g • pro. 116g • fat 32g sat. fat 9g • chol. 357mg • sod. 742mg • calc.
and socket. Turn the oven to 400°F and turn to the rotisserie setting. Cook for about 45 to 55 minutes, checking after 45 minutes with meat thermometer to achieve desired doneness. Pork is considered medium at 160°F. Carefully remove rotisserie spit using handgrip. Allow pork to rest 5 to 10 minutes and serve. * I f you brine the pork (which is recommended), refer to brining instructions on page 19. Rinse it well and omit the salt from the rub recipe.
necessary, you may tie the roast evenly with butcher’s twine to ensure even cooking. Place the rotisserie spit through the center of the roast. Set the rotisserie skewers and fixing screws so that the roast is secured firmly in place. Secure the rotisserie spit in the oven into the spit support and socket. Turn the oven to 400˚F and turn to the rotisserie setting. Cook for about 50 to 60 minutes, checking after 45 minutes with meat thermometer to achieve desired doneness.
cod with ginger lime crust Serves 4 1 4 1 ⁄4 1 11⁄2 2 cup unsalted butter cups panko (breadcrumbs) cup chopped fresh ginger tablespoon lime zest (about 1 lime) teaspoons kosher salt pounds cod, or any firm white fish Preheat oven to 450˚F set to the broil function with rack in position 3 (top position). Place the butter in the work bowl of a food processor fitted with a metal blade. Process for 5 to 10 seconds until butter has softened.
salmon with honey soy glaze Serves 4 ⁄4 ⁄4 2 1 1 cup honey or maple syrup cup soy sauce pounds boneless salmon steaks (4 steaks) Preheat oven to 500˚F and set to the broil function. In a small saucepan boil the soy sauce and honey until it reduces to a very thick consistency, about 3 minutes. Place salmon on the baking tray lined with foil. Brush the glaze all over the top and bottom of the salmon. Place baking tray in position 3 (top position).
Heat olive oil over medium/medium-high heat in a 3-quart casserole. Place the ribs on a plate and liberally salt and pepper them on both sides. In batches, brown the ribs well on all sides. Reserve browned ribs on plate. Pour off all but 1 tablespoon of oil from casserole. Once the ribs are browned preheat oven to 300˚F on regular bake with rack in position 2. Add onion, garlic, and carrots to casserole and brown.
Roasted root vegetables Makes 8 servings 1 1 1 1 4 1 ⁄4 1 1 ⁄2 pound Yukon Gold or fingerling potatoes, cut into 1⁄2 -inch rounds pound yam, peeled, cut in half lengthwise, sliced into 1⁄2 -inch half moons cup parsnips, peeled and cut into 1⁄2" slices cup peeled baby carrots garlic cloves, smashed cup extra virgin olive oil teaspoon kosher salt teaspoon coarsely ground black pepper Preheat oven to 450˚F on roast or convection bake with racks in positions 1 and 3.
brocColi and cheddar twice-baked potatoes Makes 4 servings 4 russet potatoes, about 10 ounces each 1 tablespoon unsalted butter 1 teaspoon extra virgin olive oil 2 green onions, trimmed and chopped 1 broccoli crown, about 6 ounces, trimmed and chopped into 1⁄2-inch pieces 3 ⁄4 cup milk (may use whole milk, reduced fat, or fat-free) 4 ounces sharp Cheddar, grated 1 ⁄2 teaspoon kosher salt 1 ⁄4 teaspoon freshly ground black pepper Preheat oven to 400°F on convection bake with rack in position 2.
mixture. At this point you can bake them immediately or refrigerate them until ready to bake (overnight). Turn oven to 375°F on convection bake with rack moved to position 1 (bottom position). Arrange potatoes on foil-lined (sprayed with cooking spray) baking tray only. Note: No other parts of the oven may be covered with metal foil. Bake uncovered until tops are golden brown and the potatoes are warmed through, 25 to 30 minutes. If potatoes are cold from the refrigerator, add 5 minutes to baking time.
Butter and flour an 8-cup soufflé dish well. Beat yolks and reserve. In a blender or food processor, purée 11⁄2 cups of corn with the milk; reserve. Melt butter in a saucepan. Add flour and stir with a wooden spoon until smooth. Cook over medium heat for 2 minutes, stirring occasionally. Pour the milk/corn purée into saucepan as you whisk simultaneously. Whisk until the mixture is a smooth consistency.
Preheat oven to 450°F on convection oven/roast with rack in position 1 (bottom position). On the baking sheet place the 3 ears of corn with about 1⁄4 cup of water and place on the rack. Roast for about 20 to 25 minutes until you can smell the corn and the husks are brown. Remove from oven and allow corn to cool completely before you remove the husks.
While asparagus is in the oven, roll the pâte brisée to fill a 9-inch tart pan, form the edges and return it to the refrigerator to rest for at least a half-hour. Turn oven down to 400°F on convection bake, and move rack to position 1 (bottom position). Allow at least 10 minutes for oven to come down in temperature. Line the tart shell with parchment and dried beans or pie weights. “Blind bake”: bake the pastry for about 20 minutes, until it appears a light golden.
french bread/rolls This very simple and versatile bread dough makes delicious homemade bread every time. This recipe also doubles easily. Makes one 11⁄2-pound loaf, 2 small 8-inch baguettes, or twelve 2-ounce rolls 11⁄4 1 1 ⁄2 1 1 1 teaspoons active dry yeast cup warm water (110°F) pinch granulated sugar pound unbleached, all-purpose flour teaspoon kosher salt large egg tablespoons water cooking spray Proof yeast in warm water and sugar and leave to foam, about 5 minutes.
For loaf: Lightly spray a 11⁄2-pound loaf pan. Roll dough on a floured work surface into a short, fat cylinder. Place it in prepared pan and loosely cover it with plastic for the final rise. Once loaf rises again after a half hour, make 3 slashes diagonally with a serrated knife on the top of loaf and brush with egg wash. Bake on rack position 1 for about 35 to 40 minutes, rotating pan halfway through bake time, until it is a deep golden on top and sounds hollow when tapped on the bottom.
per side. Once removed from oven, rub a cut garlic clove on each slice. Serve alone or with a topping or spread. honey wheat rolls Makes 16 rolls 6 1 11⁄2 1 2 3 ⁄4 4 1 1 1 ounces evaporated skim milk package active dry yeast tablespoons honey large egg, beaten cups unbleached, all-purpose flour cup whole wheat flour ounces unsalted butter, cut into 1-inch pieces teaspoon salt large egg tablespoon water cooking spray In a small saucepan over medium-low heat, warm the milk to 110°F and remove from heat.
into 16 equal pieces and shape each into a ball. Arrange, just touching, in prepared pan. Cover loosely with plastic sprayed with cooking spray. Allow to rise 30 minutes in a warm place. Fifteen minutes prior to baking, preheat oven to 350°F on convection bake with rack in position 2 (middle rack position). In a small bowl whisk together egg and water and brush the tops of the rolls. Bake until golden brown, approximately 30 minutes. Turn out onto cooling rack.
With machine running, pour liquid through feed tube in a steady stream as fast as the flour absorbs it, about 30 seconds. Once dough pulls away from sides of the work bowl keep the machine running for about 1 minute to knead. Place dough in a lightly floured, sealable plastic bag. Let rise in a warm place until doubled in size, about 45 minutes. Turn the dough out onto a floured work surface.
⁄2 11⁄2 2 1 ⁄2 1 ⁄2 1 ⁄2 1 cup granulated sugar cups unbleached, all-purpose flour teaspoons baking powder teaspoon ground cinnamon cup chopped, toasted pecans cup blueberries, fresh or frozen (thawing not necessary) cooking spray Preheat oven to 350°F on convection bake with rack in position 1 (bottom position). Spray standard size (21⁄2 inch x 11⁄4 inch) muffin tin with nonstick cooking spray. In a large mixing bowl, mix together the egg, buttermilk, vegetable oil, and vanilla.
11⁄2 teaspoons pure vanilla extract 1 ⁄4 cup buttermilk 11⁄2 cups mashed banana (approximately 2 ripe, medium bananas) 1 ⁄2 cup plus 2 tablespoons chopped walnuts Preheat oven to 325°F on convection bake with rack in position 1 (bottom position). Spray a 11⁄2-pound loaf pan with nonstick cooking spray. Sift together flour, baking powder, baking soda and salt and reserve. Using an electric mixer or food processor, cream together the butter and sugar. Add eggs one at a time until incorporated.
11⁄2 cups unbleached, all-purpose flour 1 ⁄4 teaspoon table salt 1 ⁄2 teaspoon pure vanilla extract 2 teaspoons lemon zest Filling 4 large eggs 11⁄4 cups granulated sugar 1 heaping tablespoon lemon zest (approximately 2 lemons) 2 ⁄3 cup lemon juice (approximately 3–4 lemons) Meringue 6 large egg whites 1 cup granulated sugar Crust Preheat oven to 325˚F on convection bake with rack in position 1 (bottom position). Place softened butter in a large mixing bowl.
Pour filling into the warm shortbread crust. Bake for 20 minutes until the top is set but the middle still has movement. Once the filling is set, remove from oven; reduce oven to 325°F on regular bake. Start beating the egg whites with an electric mixer. Once the whites are frothy pour the cup of sugar into the bowl with the mixer running. Beat whites until peaks form that are stiff but not dry. Pour the meringue on the top of the pie, covering the entire surface of the pie including the crust.
Preheat oven to 325˚F on regular bake with rack in position 2 (bottom position). Place flour, sugar, salt, and butter in the work bowl of a food processor fitted with a metal blade. Process until mixture is like a coarse meal, about 10 seconds. While machine is running, add egg through feed tube, processing until dough forms a ball, about 30 seconds. Spray pie plate with nonstick cooking spray. Press the dough into the pan. Be sure to form a solid border of crust onto the edge of the pan.
Place butter in work bowl and pulse until the mixture resembles coarse meal with the butter visible only in tiny pea-sized bits. With the machine running, pour in water through feed tube. If mixture feels dry and does not come together when you press it together in your hand, add more ice water, a tablespoon at a time, until mixture comes together. Carefully process only until a dough ball forms.
Preheat oven to 400˚F convection bake with rack in position 2 (bottom position). Divide pâte brisée into 2 pieces, one slightly larger than the other. On a floured surface, roll out the smaller of the two pieces to fit the pie plate so that the dough hangs over the edge of the plate. Cut the dough if necessary so that the overhang is about 1 inch long. Place in the refrigerator for at least a half hour to rest. Slice the apple halves thin (about 1⁄8-inch) and place in large mixing bowl.
At this point the crust may be done but apples may need additional time to bake. Cover the pie crust with foil and return to the oven for up to an additional half hour, until the juices are bubbling. Serve warm or room temperature. Nutritional information per serving: Calories 593 (29% from fat) • carb. 105g • pro. 5g • fat 20g sat. fat 12g • chol. 50mg • sod. 182mg • calc. 29mg Note: The amount of apples depends on how deep your pie plate is.
to remove and discard any excess flour. Place the parchment circle on the bottom of the pan and butter and flour it as well. Melt the chocolate and butter together in a double boiler and reserve. Separate the eggs into two mixing bowls, adding the extra whites to the bowl of whites. Add 3⁄4 cup of sugar to the bowl of yolks. Using an electric mixer, mix the yolks and sugar until mixture is pale and thick, about 3 to 4 minutes. Whisk chocolate into yolks and sugar.
©2008 Waring Consumer Products Division of Conair Corporation 150 Milford Road East Windsor, NJ 08520 www.waringproducts.