
Installation and Operation Manual


2
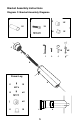
Afxing the Towel Warmer to the Wall
Step 1
Draw a diagram of the preferred location of the brackets on the
Towel Warmer box to create a template (see Step 2 for template
instructions). At least two of the four brackets must be attached
directly to a stud.
The Innity Plug-In model must be installed less than 6 feet
(183cm) from a properly grounded outlet to ensure the plug can
reach. Make sure to measure the distance from where the plug
is attached to the towel warmer to the electrical outlet. Do NOT
use an extension cord to make the connection between the towel
warmer plug and outlet.
Step 2
Create the template:
A. Attach brackets into desired positions on the Towel Warmer
(see pages 7-8 for bracket assembly for each model).
B. Place Towel Warmer on the box (or a large sheet of paper) and
lay on a at surface with brackets facing downwards.
C. Mark the location of the brackets.
D. Use the template as a guide to mark the wall with the correct
locations of the four brackets, ensuring the following:
• Plug-in model must be installed less than 6 feet (183cm)
from properly grounded outlet. Do NOT use an extension
cord.
• At least two of the brackets are lined up with a wall stud.
• The towel warmer is level.
• Electrical supply wire can enter the Power Leg.
Step 3
Install the brackets onto the wall. Use the drywall anchors that are
supplied for the brackets that are not being installed into a stud.
Refer to pages 7-8 or 10-11