
Owner manual

Warner Electric • 800-825-9050 P-1613 • 819-0522
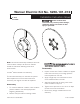
Note: This armature assembly is balanced and care
must be taken to keep it flat and true. Caution
should be used when following instructions
shown below.
Locktite
®
will be needed at re-assembly.
This armaure assembly is a matched component.
When replacement of the armature becomes
necessary, the magnet must also be replaced.
Disassembly
1. To ensure a balanced condition, mark armature
position relative to the hub keyway before
beginning disassembly.
2. Remove the (6) armature mounting screws.
DDoo nnoott ccllaammpp aarrmmaattuurree iinn aa vviiccee oorr
ssiimmiillaarr ddeevviiccee ttoo pprreevveenntt rroottaattiioonn..
Reassembly
3. Inspect the new hub. Check condition of tapped
holes and remove any oil or foreign particles
found anywhere on the hub.
4. Apply a single drop of Loctite #242 to each
of the threaded holes in the hub.
5. Align the keyway with the timing mark made
to the armature in step one.
6. Tighten each capscrew to 16 to 24 ft. lb. Wipe
excess Loctite from all surfaces.
7. Remove any foreign material found on the
assembly.
Warner Electric Kit No. 5250-101-012
Installation Instruction Sheet
P-1613
819-0522
Failure to follow these
instructions may result in product damage,
equipment damage, and serious or fatal
injury to personnel.