Pump Clutch Installation P-1423 819-0388 Installation Instructions
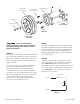
Rotor-Pulley Assembly (3) Capscrews & Lockwashers (2) Field Assembly (1) Washer (4) Pump (Not Included) Cap Screw (5) Field Assembly Rotor-Pulley Assembly Failure to follow these instructions may result in product damage, equipment damage, and serious or fatal injury to personnel. General This pump clutch has been developed specifically for use in pump applications. Properly installed, it will provide maintenance-free service.
Installation Step 5 (If Required) Diagnose Clutch Failure To remove the rotor-pulley from the pump shaft, remove the self-locking capscrew (5) and washer (4). Then, insert a 5/8-11 UNC capscrew (not provided) into the center hole of the rotor. Rotate the screw against the pump shaft until the rotor breaks loose from the shaft. Most clutch failures are a direct result of a system problem or failure. Before installing a new clutch, determine what caused the old clutch to fail and fix the system problem.
Warranty Warner Electric LLC warrants that it will repair or replace (whichever it deems advisable) any product manufactured and sold by it which proves to be defective in material or workmanship within a period of one (1) year from the date of original purchase for consumer, commercial or industrial use. This warranty extends only to the original purchaser and is not transferable or assignable without Warner Electric LLC’s prior consent. Warranty service can be obtained in the U.S.A.