
Manual


5
Level COntrols - IOM 200 Vacuum Breaker 200_IOM_RevAa_1112
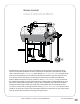
SEAT INSPECTION AND CLEANING PROCEDURE:
1) Remove line or tank pressure and isolate vacuum breaker. (It is recommended that the vacuum breaker be removed
from the piping or tank for the seat inspection and cleaning procedure. It is recommended that you have an Inspection
Kit on hand before beginning the procedure.)
2) Remove nuts and bolts fastening valve body to adapter body.
3) Remove valve body from adapter body.
4) Remove capscrews from spring chamber.
5) Remove spring chamber from valve body.
6) Remove jamnuts from stem. Be careful, spring is preloaded.
7) Remove spring button.
8) For vacuum breakers with single spring remove spring. For vacuum breakers with dual springs remove
outer and inner springs.
9) Remove disc and stem assembly from valve body.
10) Clean gasket surfaces on valve body and adapter body.
11) Inspect the integral seat or seat ring in the valve body. The integral seat or seat ring must be clean and free from
deposits, scratches, or other damage. If deposits are present clean the seat with red (ne) crocus cloth and a
general purpose degreasing solvent. Cloths or pads containing ultra ne silicon carbide such as a Scotch-Brite
Ultra Fine Hand Pad or Norton Bear-Tex Clean & Finish Pad are also suitable for cleaning the seat. Clean the seat
with a circumferential motion around its diameter not with a longitudinal motion across its length. For vacuum
breakers with an integral seat, if after polishing the seat, you can still detect deposits, scratches, or other damage
with your ngernail , then replace the vacuum breaker. For vacuum breakers with a replaceable seat ring, if after
polishing the seat, you can still detect deposits, scratches, or other damage with your ngernail, then replace
the seat ring. For vacuum breakers with an integral seat, after cleaning, a light coat of primer may be applied to
protect the seat.
12) Install disc and stem assembly in valve body.
13) For vacuum breakers with single spring, install spring over stem and center spring over pilot on valve body.
For vacuum breakers with dual springs, install inner spring over stem. Install outer spring over stem and inner
spring. Center outer spring over pilot on valve body.
14) Install spring button on stem. Watch orientation. Center spring(s) over pilot(s) on spring button.
15) Install jamnuts on stem. DO NOT tighten until opening force is adjusted see following page.
16) Install new gasket on adapter body.
17) Install valve body on adapter body.
18) Install bolts through holes in adapter body and valve body. Install nuts on bolts. Tighten nuts and bolts in
increments in an alternating pattern.
19) Complete steps 4 thru 10 of Opening Force Adjustment Procedure.