GLV UNDERCOUNTER DISHWASHER OperatorManual
WARNING Before installation and commissioning, you must read the safety instructions and warnings carefully and all the warning labels attached to the equipment. ! ! IMPORTANT Failure to comply (even partially) with the instructions given in this manual will invalidate the product warranty and relieves the manufacturer of any responsibility. IMPORTANT The alteration of machine operation, design or the replacement of parts not approved by the manufacturer may void warranties and approvals.
Safety Instructions WARNING Equipment contains dangerous voltages and can be hazardous if installed or operated incorrectly. Non-compliance with Warnings or failure to follow the instructions contained in this manual can result in loss of life, severe personal injury or serious damage to property.
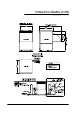
Installation WARNING Installer must be suitably qualified and ensure compliance with all local codes and standards including AS/NZS 3500.1. ! Failure to comply even partially with installation instructions may void the warranty. Positioning Unpack machine, check for damage & complete delivery. Install machine on sound waterproof self-draining floor & adjust feet to level machine. Adjacent surfaces should be heat resistant and moisture proof, especially benchtop lower surfaces above undercounter machines.
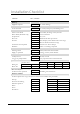
Installation Checklist CHECK Delivery Supplied complete Position Level and stable Water Isolator valve fitted DCVs fitted (Washtech only) Temperature Flow rate Pressure Cold water when required Hardness Power Isolating switch Supply as specified Waste Usually 40 mm Air gap on pumped drain Chemicals product name Detergent Rinse Aid Machine operation Run several cycles Confirm correct operation Operator training OK / NOTES no transit damage on sound, waterproof, self draining floor Accessible, all fittings s
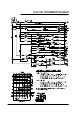
Operation Description of Controls Operating Instructions Start up Fit drain upstand with filter, scrap trays and shut door. Turn wall and machine power switches on. Power light glows red and machine fills automatically When Wash Ready light and Rinse Ready light glow amber the machine is ready to run and may be started. Operation Load rack into machine and shut door. Press Start button (1, 2 or 3) for 1, 2 or 3 minute cycle accordingly. Cycle light glows green while machine operates.
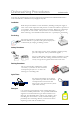
Dishwashing Procedures for best results Note: these are general instructions to assist in getting the best performance from Washtech dishwashers – some comments and / or illustrations may not apply to every unit. Installation Read the Operator Manual. Correct installation, including an adequate supply of water at the correct temperature and pressure is essential for effective operation of your machine. Refer installation instructions for details. Drain hose outlet height is important on some models.
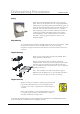
Dishwashing Procedures for best results Drying Single tank commercial dishwashers do not have a drying cycle. However, the machines do rinse at high temperatures which promote fast drying particularly when drying agents are used. We recommend prompt removal of the rack from the machine - leave the rack on the bench for 2 to 3 minutes before emptying. This time will be reduced with correct use of drying agent (rinse fluid) which reduces water surface tension and allows water to drain quickly from washware.
Notes