
Getting Started Owner's manual

Wasp Labeler User Manual
Resizing/Minimizing Was
p Labeler
Wasp Labeler can be resized to fit your whole screen or reduced to appear as a portion of your
screen.
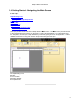
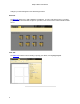
To resize the window, click the icon in the top, right of the Main screen, as shown below:
The screen will reduce in size when the icon is clicked. You can resize the screen by dragging any
of the corners or borders. Labeler will remember the size when it is closed and re-opened.
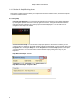
To minimize the screen and place it on the taskbar, click the minimize icon in the top, right of the
Main screen, as shown below:
Labeler will be placed on your taskbar. To reopen it, click on the icon on your taskbar.
1.4.2 Section B: Tabs
File Tab:
The File Tab
contains save, open, and close options. This tab also allows you to launch example
labels and check for updates to your software. Click on an icon to access a function.
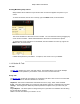
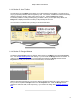
Design Tab:
The Design Tab
contains all of the options for customizing your label. Click on an icon to access that
function. The toolbar on this tab is divided into 5 sections:
Clipboard - This section contains basic commands such as Cut, Copy, Paste, Undo and Redo.
Insert - The Insert options allow you to insert text, basic shapes, a picture or a barcode into your label.
Arrange - The Arrange menu allows for precision placement of objects or text you insert onto your
label.
Layout Options - Use these options to change the layout of your label or to hide/show the ruler along
the top and side of the label.
View - The View menu allows you to zoom in or out.
7