
Use and Care Manual


INS10477 - 8/15
7
2
B
B
1
3
C
D
E
F
B
x3
4
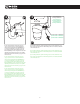
1) Clean the area around the sink drain where the disposal is to be
mounted. (Evenly apply ½” thick rope of plumber’s sealant around
Sink Flange (B).)
2) Position the Sink Flange (B) in the center of the sink drain opening.
Push the sink ange down rmly to make a good seal.
Note: Excess sealant will be squezzed out during the installation
and should not be cleaned up until the end DO NOT move or
rotate the sink ange once seated or the seal may be broken.
Note: Some sink manufacturers may recommend “Non- Staining”
plumber’s sealant, check your sink care instructions. Using a towel
in the sink to prevent scratching, place a weight on the sink
ange to hold it in place until the sink ange assembly is
secured from the underside of the sink.
Re-assemble the Fiber Gasket (C), Backup Flange (D) and Mounting
Ring (F) and Screws (E). From underneath the sink, place the ber
gasket, backup ange and then the mounting ring onto the ange in
this order.
Re-assemble the Fiber Gasket (C), Backup Flange (D) and Mounting
Ring (F) and Screws (E). From underneath the sink, place the ber
gasket, backup ange and then the mounting ring onto the ange in
this order.
Re-assemble the Fiber Gasket (C), Backup Flange (D) and Mounting
Ring (F) and Screws (E). From underneath the sink, place the ber
gasket, backup ange and then the mounting ring onto the ange in
this order.
Holding all 3 parts up against the sink, pull the Snap Ring (G) open
and press rmly into the groove on the sink ange until it snaps into
place. Ensure Snap Ring (G) is locked into place. Failure to properly
seat Snap Ring (G) in groove will prevent proper installation.
Holding all 3 parts up against the sink, pull the Snap Ring (G) open
and press rmly into the groove on the sink ange until it snaps into
place. Ensure Snap Ring (G) is locked into place. Failure to properly
seat Snap Ring (G) in groove will prevent proper installation.
Holding all 3 parts up against the sink, pull the Snap Ring (G) open
and press rmly into the groove on the sink ange until it snaps into
place. Ensure Snap Ring (G) is locked into place. Failure to properly
seat Snap Ring (G) in groove will prevent proper installation.
G
5