
User guide


User Guide 99
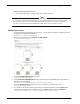
Managing Network Traffic
Enable 1-to-1 NAT
Note
You must add at least one 1-to-1 NAT entry before you can enable 1-to-1 NAT.
For more information, see the subsequent section.
1 To connect to the System Status page, type https:// in the browser address bar, and the IP address
of the Firebox X Edge trusted interface.
The default URL is: https://192.168.111.1
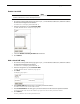
2 From the navigation bar, select Firewall > NAT.
The NAT (Network Address Translation) page appears.
3 Select the Enable secondary IP addresses check box.
4 Click Submit.
Add a 1-to-1 NAT entry
1 To connect to the System Status page, type https:// in the browser address bar, and the IP address
of the Firebox X Edge trusted interface.
The default URL is: https://192.168.111.1
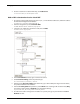
2 From the navigation bar, select Firewall > NAT.
The NAT (Network Address Translation) page appears.
3 Click Add.
The Mapping page appears.
4 In the Public Address text box, type a secondary external IP address.
The address must be on the external network subnet.
5 In the Private Address text box, type a private IP address from the trusted or optional network.
The Firebox X Edge maps the private IP address you type here to the secondary external IP address.
6 Click Submit.
The entry is added to the Secondary IP Addresses list.