
User guide


User Guide 141
Configuring Virtual Private Networks
- First, set the device to Bridge Mode. In Bridge Mode, the Edge gets the public IP address on its
external interface. Refer to the manufacturer of your NAT device for more information.
- Set up Dynamic DNS on the Firebox X Edge. For information, see “Registering with the
Dynamic DNS Service” on page 58. In the Phase 1 settings of the Manual VPN, set the local ID
type to Domain Name. Enter the DynDNS domain name as the Local ID. The remote device
must identify your Edge by domain name and it must use your Edge’s DynDNS domain name
in its Phase 1 setup.
• If the NAT device to which the Firebox X Edge is connected has a static public IP address:
- In the Phase 1 settings of the Manual VPN, set the local ID type drop-down list to Domain
Name. Enter the public IP address assigned to the NAT device’s external interface as the local
ID. The remote device must identify your Firebox X Edge by domain name, and it must use this
same public IP address as the domain name in its Phase 1 setup.
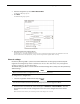
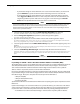
Phase 2 settings
Phase 2 negotiates the data management security association for the tunnel. The tunnel uses this phase
to create IPSec tunnels and put data packets together.
You can use the default Phase 2 settings to make configuration easier.
Note
Make sure that the Phase 2 configuration is the same on the two devices.
To change the Phase 2 settings:
1 Select the authentication method from the Authentication Algorithm drop-down list.
2 Select the encryption algorithm from the Encryption Algorithm drop-down list.
3 To use Perfect Forward Secrecy, select the Enable Perfect Forward Secrecy check box.
This option makes sure that each new key comes from a new Diffie-Hellman exchange. This option makes the
negotiation more secure, but uses more time and computer resources.
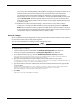
4 Type the number of kilobytes and the number of hours until the Phase 2 key expires.
To make the key not expire, enter zero (0). For example, 24 hours and zero (0) kilobytes means that the Phase 2 key
is renegotiated each 24 hours no matter how much data has passed.
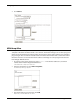
5 Type the IP address of the local network and the remote networks that will send encrypted traffic
across the VPN.
You must enter network addresses in “slash” notation (also known as CIDR or Classless Inter Domain Routing
notation). For more information on how to enter IP addresses in slash notation, see this FAQ:
http://www.watchguard.com/support/advancedfaqs/general_slash.asp.
6 Click Add.
Repeat step 5 if you must add additional networks.