
Owner manual
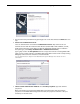
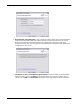
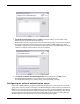
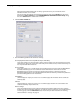
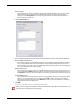
Table Of Contents
- WatchGuard®Mobile VPN with IPSec Administrator Guide
- 1 Configure the Firebox X Edge to use Mobile VPN with IPSec
- 2 Using Fireware Policy Manager to Configure Mobile VPN with IPSec
- Before You Begin
- About Mobile VPN Client Configuration Files
- Configuring the Firebox for Mobile VPN
- Modifying an Existing Mobile VPN Profile
- Configuring WINS and DNS Servers
- Locking Down an End-User Profile
- Configuring Policies to Filter Mobile VPN Traffic
- Re-creating End-User Profiles
- Saving the Profile to a Firebox
- Distributing the Software and Profiles
- Additional Mobile VPN Topics
- 3 Mobile VPN Client Installation and Connection

Administrator Guide 9
Configuring the Firebox for Mobile VPN
3 Use the instructions provided here to go through each screen of the wizard. Click Next after each
step.
4 Select a user authentication server
Select an authentication server from the Authentication Server drop-down list. You can
authenticate users with the internal Firebox database (Firebox-DB) or with a RADIUS, SecurID,
LDAP, or Active Directory server. Make sure that this method of authentication is enabled in
Policy Manager (select Setup > Authentication > Authentication Servers).
Type a group name in the Group Name field. You can type the name of an existing Mobile VPN
group, or enter a group name for a new Mobile VPN group. Make sure the name is unique among
VPN group names as well as all interface and tunnel names.
See the Authentication chapter in the WatchGuard
®
System Manager User Guide for more
information.
5 Select a tunnel authentication method: Select Use this passphrase. Type and confirm a
passphrase.
When your remote users import their Mobile VPN connection profile, they will need this
passphrase. In the Mobile VPN Configuration Assistant, this passphrase is known as the “pre-
shared key” or “shared secret.”