
User guide


Changing Your Network Settings
60 WatchGuard Firebox X Edge
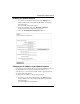
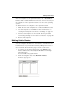
2 From the navigation bar, select Network > Optional.
The Optional Network Configuration page appears.
3 Type the first address of the new network address range in the
IP Address text field.
4 If necessary, type the new subnet mask.
Most networks use 255.255.255.0 which includes 254 addresses.
Using DHCP on the optional network
The DHCP Server option sets the Firebox X Edge to give IP addresses
to the computers on the optional network. When the Firebox
receives a DHCP request from a computer on the optional network,
it gives the computer an IP address. A factory default Firebox has
the DHCP Server option for the optional interface turned off.
To use DHCP on the optional network:
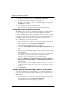
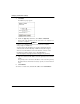
1 Use your browser to connect to the System Status page. From
the navigation bar, select Network > Optional.
The Optional Network Configuration page appears.
2 Select the Enable DHCP Server on the Optional Network check
box.
3 Type the first available IP address for the optional network. Type
last IP address.
The IP addresses must be on the same network as the optional IP address.
For example, if your optional IP address is 192.168.112.1, the IP
addresses can be from 192.168.112.2 to 192.168.112.254.
4 Type the WINS Server Address, DNS Server Primary Address,
DNS Server Secondary Address, and DNS Domain Suffix in the
related fields.
Use these fields if you have a WINS or DNS server. If you do not enter a
value, the Firebox uses the same values as those used for the external
network.
5 Click Submit.
Setting optional network DHCP address reservations
You can manually assign an IP address to a specified computer on
your optional network. The Firebox identifies the computer by its
MAC address.
1 Use your browser to connect to the System Status page. From
the navigation bar, select Network > Optional.
The Optional Network Configuration page appears.