
Owner`s manual


5
I. Installing the feed water valve
The saddle tapping valve which is supplied is designed to be
used on 3/8” - 1/2” OD soft copper tubing (plain or chromed)
and rigid metal pipe. Do not use with flexible ribbed tubing
because it requires special hardware. Optional feed valves should
be used for this purpose.
IMPORTANT: Some local plumbing codes may prohibit the use of
saddle-type valves. In this case, optional feed valve assemblies
should be used.
Soft Copper Tubing Installation:
A) Turn off the cold water feed valve under the sink, or the
main feed valve for the house.
B) Before installing the saddle tapping valve, make sure the
piercing lance does not protrude beyond the rubber gasket.
See instructions on bag.
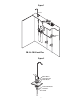
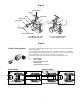
C) Place saddle tapping valve around the copper tubing and
tighten the mounting screw until the valve is tight. Be
careful not to deform the copper tubing (see Figure 3).
D) To pierce the soft copper tubing, turn the handle clockwise
until it is firmly seated. The valve is closed in this position.
E) Turn on the main supply valve to pressurize cold water line.
Check for leaks.
F) Connect a length of 1/4” orange tubing to the feedwater
valve, using the insert, plastic sleeves and brass
compression nut.
Rigid Metal Pipe Installation:
A) Turn off the cold water feed valve under the sink, or the
main feed valve for the house.
B) Drill a 3/16” hole at the desired location on the metal pipe.
To prevent shock hazard, use a battery operated drill.
C) Turn the saddle tapping valve clockwise to expose the
piercing lance beyond the rubber gasket no more than 3/16”.
D) Place saddle tapping valve around the copper tubing
making sure the piercing lance is located in the hole and
tighten the mounting screw until the valve is tight (see
Figure 3).
E) Turn saddle valve handle clockwise to close valve.
F) Turn on the main supply valve to pressurize cold water line.
Check for leaks.
G) Connect a length of 1/4” orange tubing to the feedwater valve,
using the insert, plastic sleeve and brass compression nut.
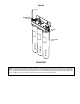
J. Make tubing connections
NOTE: With all of the components in place, the tubing connections
can be made. Be sure to arrange the tubing so that there are no
sharp bends. Leave some “play” in the tubing for ease of servicing.
NOTE: Try to keep the tubing from the filtration system to the
faucet as short as possible to ensure good water flow.
1) Connect the 1/4” orange tubing to the “Push In” male
connector on the inlet side of the filtration assembly (refer
to Figure 4 on the use of “Push In” plastic fittings).
2) Connect the 1/4” blue tubing from the faucet to the
“Push In” fitting attached to the outlet connection on the
filtration assembly.
K. Installing and replacing filter cartridges
NOTE: In order to ensure proper performance, it is essential
that the filters be installed in the correct location. Use the icon
coded labels to match the filter cartridges with their correspon-
ding filter head.
1) Close the feed water valve and lift up the faucet handle. Wait
approximately 10 seconds for the system to depressurize.
2) Twist the filter cartridge 1/4 turn to the left so that the ears
on the cartridge are able to disengage from the head.
Firmly pull the cartridge downward to remove it from the
head. It may be necessary to twist the cartridge slightly
from side to side to help free it from the head.
3) Remove the new filter cartridge from its sanitary sealed
wrapper. (Double check to see that it is the correct
replacement filter cartridge by comparing the labels.)
4) Using either tap water, food grade silicone lubricant or
glycerine, lubricate the o-ring seals to make cartridge
insertion easier.
5) Line up the cartridge ears, insert the cartridge and push it
up into the head until it is firmly seated. Twist the cartridge
1/4 turn to the right to lock it into place.
6) Open the feed water valve and carefully check for leaks.
7) Allow system to operate with the faucet open for at least 10
minutes. This will allow the cartridge to properly flush prior
to use.