
Installation Guide

Installing New Yard Hydrant Head Assembly
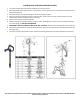
1. Turn water supply off and lift hydrant handle (8) up to drain pressure.
2. With the hydrant handle (8) in the UP or “ON” position, use two pipe wrenches, unthread the old hydrant head
(3) from the pipe (14).
3. Pull hydrant head up a little bit (enough to reach the coupling nut (13)).
4. Using one vise-grip to hold the coupling nut (13) in place, use the other vise-grip or channel lock to turn the
clevis rod (10) counter-clockwise until it is removed.
5. Pull the inner rod (15) out of the pipe (14).
6. Using one vise-grip to hold the coupling nut (13) in place, hand tighten the clevis rod on the new hydrant head
into the coupling nut. DO NOT OVERTIGHTEN.
7. IMPORTANT: WITH THE HANDLE IN THE UP OR “ON” POSITION, Place the inner rod (15) back into the pipe (14).
8. Wrap the male threads of the pipe (14) with thread tape. Using two pipe wrenches, thread the hydrant head (3)
to the pipe (14).
9. Turn water supply on and check for leaks. If hydrant is leaking, please refer to hydrant adjustment instructions.
Visit the www.watersourceusa.com ‘product support’ page to view more documents and videos or call 800-346-7611
if you have any questions!