
Installation Guide

3. Now you will install the first four anchors – the center
anchor on each of the 4 sides of the pool. Use the hammer
drill and a 3/4” drill bit and be sure to keep the drill
perpendicular to the deck surface. Drill down 17/8” into
deck at the center mark on one side of the pool. Remove
drilling dust from the anchor hole. Remove anchor screw
from its casing and spray casing and tamping tool with
silicone. Insert tamping tool in casing and tamp anchor in
place.
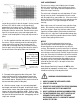
4. Use the supplied installation rod to attach a spring to
the anchor. Slip the notched end of the rod through the
round section of the spring. Place the notch over the
anchor and use leverage to pull the installation rod away
from the pool, so that the spring slides down the rod and
the round section of the spring slides over the anchor.
5. Proceed to the opposite side of the pool. Drill
and install the anchor for the opposite end of the
same strap. Attach the spring to the anchor using
the method above. Repeat for the center anchor on
the two remaining sides of the pool.
6. After the center straps are secured along both
the length and width of the pool, install those straps
closest to the center along the length and then those
nearest to the center along the width. Grab a strap,
stretch it straight and tight to the 18” chalk line. Mark
the spot for the anchor and drill. Keep going until all
straps are secured.
CARE & MAINTENANCE
The cover must always stretch tightly across the pool.
After the initial installation, some stretching may occur.
This is normal. Each spring should be compressed 50%.
Adjust the straps if necessary.
The water level in the pool must not drop below 18” from
the top, since the cover is designed to rest on the water
with the weight of any snow and/or ice. If the water level is
too low, the cover will stretch excessively and place undue
strain on the cover. This type of damage will void the
warranty.
Mesh safety covers will screen out leaves and other large
debris. Dirt and other small particles will filter through
cover into the pool. Algae may also form under the cover
if pool has not been properly chlorinated and winterized.
When not in use, store cover inside provided storage bag
in a dry place and off the ground to prevent mice or other
creatures from getting into the cover.
NOTICE
This cover has been determined to be free of any
manufacturing or material defects prior to shipping.
Do not drag cover on concrete deck or any abrasive
surfaces. Check pool to assure that water level is not lower
than 18” below the top of the pool coping. Be careful not to
catch springs on cover material. Carefully inspect the cover
every year at the time of installation to assure that material
has not deteriorated from normal use. It is recommended
that rough surfaces be protected with padding (such as
carpeting, vinyl, etc.) Any cover needing repair must be
returned no later than July 1st for repair no later than
September 30th.
Water Warden Pool Safety Products will NOT be held
responsible for improperly installed covers. Safety covers
should be installed by a trained professional.
Use leverage to pull
rod away from
cover. Spring will
slide down the rod
and over the
anchor.
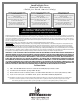
WARNING! AVOID DROWNING RISK!
1. OBJECTS CANNOT BE SEEN UNDER COVER.
2. STAY OFF THE COVER.
3.
REMOVE THE COVER COMPLETELY BEFORE SWIMMING.
4. THERE IS NO SUBSTITUTE FOR COMPETENT
5. ADULT SUPERVISION AROUND A SWIMMING POOL.
6. THE WATERWARDEN POOL SAFETY COVER IS NOT
DESIGNED TO BE A SUBSTITUTE FOR ADULT
SUPERVISION, NOR IS IT A GUARANTEE AGAINST
ACCESS TO THE POOL.