Contents Installation Instructions Before installation Parts List Product Introduction installation Tips installation Steps Step 1: install the Feed Water Adapter Step 2: install the Faust Step 3: Install the Batteries and Place the System Step 4: Connect Tubing Step 5: Start up the System Owner's Manual Display and Operation Section 1: Working Mode Display -Section 2: Filter Life Reminder Section 3: Filter Replacement Guide Section 4: Battery Life Reminder and Replacement Guide System Maintenance HEAR EEE
Installation Instructions Before Installation inspect the Package Open the box and take out the system housing, all the components, and connect fittings. Inspect them according to the parts list to ensure nothing is left out or damaged during shipping. If there are any parts cracked or broken, please do not proceed with the installation and contact us to identify and get familiar with all components for quick installation.
Parts List CN Watergate Watergate Water dig Watergate eS Stern Housing Front Cover PP Fitter UF Filter CT Filter X18et Lock Clip Teflon Tape AA Battery X4 x1 X3 Feed Water Adapter White 3/8" 3/8" and 172 PE Tubing Faucet X 1 Set X 58 X 1st | White 1/4" PE Tubing X 58°
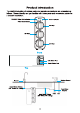
Product Introduction The brief introduction of various parts and sample connections are presented as follows. Please identify and get familiar with these parts and connection points for a smooth installation.
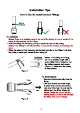
installation Tips How to Use the Quick-Connect Fittings Mark for Full Insert = v Hix To connect: Mote: There is an existing mark at the end of the tubing for you to confirm if the tubing Is fully inserted into the filling. * Push the tubing into the fitting until you reach the mark on the tubing. Bose: If the tubing Is not fully inserted, no seal will be created, and leakage will acre, = When the tubing is fully inserted, put the bus lock clip on the fitting.
How to Drill 2 Hole into Your Sink or Counter top (Optional) Mote: Please confirm if there is an existing hole available to install the faucet. if not, please drill a hole in accordance with the following steps. There Is also a sticker for your reference to drill the hole. Remember to wear safety glasses to protect your eyes while drilling the faucet hole. 1. Choose a diamond core bit for granite, and a carbide drill bit for stainless steel. Bo not use a hammer drill on natural stone, glass or ceramic; 2.
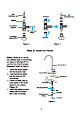
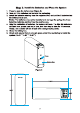
] 1" Cok Water Pips Unshorn Cold Warts Pips Washer Ford Water mp Adapter ii 400 3/8" Inlet Water w= Tubing = $ ll Cold Water 1 Supply Valve Ua (Ce CD Figure 3 Figure 4 Step 2: Install the Faucet Mote: If there is no hole in your kitchen sink or counter top, you have to drill one (1"} or use the hole from the soap dispenser. Refer to Page 5. 1. Insert the faucet spout into the faucet body; 2. Insert the faucet stem into the hole on the counter top; 3.
wh Step 3: Install the Batteries and Place the System . Press to open the battery box (Figure 6). Take out 3 AA batteries and remove the packaging. Install the batteries starting from the negative side, and put the 3 batteries into the battery box in tum. Mote: The batteries may not be installed and damage the spring wire if you install the batteries starting from the positive side. After the installation of batteries, the system will beep.
Step 4: Connect Tubing Mete: Confirm the tubing length you need and cut the tubing if it's too long, referring to “How to Use the Quick-Connect Fittings” on page 4. 1. Install the Inlet Water Tubing * Connect the inlet water tubing from the feed water adapter to the inlet water port and pop the lock clip on the fitting; Note: Make sure it is fully inserted until you reach the mark on the tubing. | | Inlet Water Fahd Water Adapter [ Tubing Infer Water Tubing 2.
again, until reaching 10 minutes. 4. Confirm the 10-minute flushing is completed before muting off the faucet. Marks sure the faucet does not leak. 5. install the front cover (magnetic force). Watergate Filter Reset Bu Figure 7 Owner's Manual Display and Operation Section 1: Working Mode Display Filter life indicators and power indicator are off during normal water filtration. Touching one of the filter reset buttons slightly will start up all indicators.
Mote: Filter life may vary depending on source water quality and water usage. Please replace the filter according fo the filter life indicators. There are helpful electronic filter indicators (PR/UF/CT) on the front panel that will notify you the filter replacement by color change and beep.
4, Push the filter into the hole with a certain pressure and rotate it a 1/4 tum clockwise, until the triangle mark is aligned with the solid circle on the front panel. You may hear a dick when the filter is fitted properly; Note: Repeat the above steps to install the other filters. 5, Reset the filter life indicator and flush the filter after replacement (please refer to the following steps). Mote: You could refer to the following steps to change the filter if it's hard to remove the old filter. 1.
Section 4: Battery Life Reminder and Replacement Guide The power indicator displays different status according to the remaining battery power. When the batteries need to be replaced, the power indicator will flash in blue and the system will beep while getting water (Figure 9). Reminding modes Battery life | Remaining fife (D: i inning ie {Day} Battery ie indicator Buzzer The bus light will be on after Normal bes Touching any indicator slightly.
System Maintenance = The installation sequence of filters shall not be reversed fo avoid affecting the normal function of the system. = If you do not use the system for a long time {more than 1 week), iris recommended to tum on the faucet to flush for a while before using it again. = If the system is not used for a long time, please disconnect the water supply and remove the batteries. = Please replace the filter regularly according to the filter life indicator.
= Water is not flowing out of the faucet. a. The filters are blocked. If the water quality is poor, the filters may be blocked afters period of use. They will need io be replaced. b. if the filters are not situated in place, install the filters again according fo the installation instructions. ¢. The water inlet valve is not open. Please check the cold water valve and the feed water adapter to ensure that they are fully opened. « The water tastes weird. a. The filters have expired.
+ The filter replacement reminder is inaccurate. a. The service life of a filter is monitored through both usage time and filtered water amount. There will be replacement reminder when either of the two indicators reaches its upper limit. For example, if the filtered water amount reaches the upper limit while the usage time does no, there will also be a replacement reminder. So please follow the instructions and replace the filter on ime. b.
Our sole obligation under this warranty shall be repair or replacement of a nonconforming product or parts of this product, or at our option, return of the product and a refund of the purchase price. Our obligation does not include the cost of transportation. We are not responsible for damage in transit, and claim that such damage should be presented to the carrier by the customer. The warranties set forth herein are the only warranties made by us with respect fo the product.