An AGA Company FREE STANDING - REFRIGERAT OR OPERATING & INSTALLATION MANUAL Please read these instructions carefully before use .
TABLE OF CONTENTS Page No. 1. Introduction . . . . . . . . . . . . . . . . . . . . . . . . . . . . . . . . . . . . . . . . . . . . . . . . . . . . . . . . . . . . .3 2. Caring for The Environment . . . . . . . . . . . . . . . . . . . . . . . . . . . . . . . . . . . . . . . . . . . . . . . .4 Disposal of Packing Material . . . . . . . . . . . . . . . . . . . . . . . . . . . . . . . . . . . . . . . . . . . .4 Disposal of Old Appliance . . . . . . . . . . . . . . . . . . . . . . . . . . . . . . . . . . . . . .
Page No. 16. Using The Refrigerator Efficiently . . . . . . . . . . . . . . . . . . . . . . . . . . . . . . . . . . . . . . . . . . . .11 Storage Zones in Refrigerator . . . . . . . . . . . . . . . . . . . . . . . . . . . . . . . . . . . . . . . . . . .11 Food Not To Be Stored In A Refrigerator . . . . . . . . . . . . . . . . . . . . . . . . . . . . . . . . . . .12 Storing Food Correctly . . . . . . . . . . . . . . . . . . . . . . . . . . . . . . . . . . . . . . . . . . . . . . . . .12 Fruit & Vegetables .
INTRODUCTION Dear Customer, Thank you for buying a Waterford Appliance. The quality of Waterford’s appliances is exceptional and immediately visible. Each one is designed to withstand the most demanding kitchen environment. But its not just about sleek contemporary looks; every detail reflects Waterford Stanley’s long-standing design for total performance ethos. That is why our ovens are easy to clean, our hobs are powerful, our extractor hoods efficient and our refrigerators designed for optimum storage.
CARING FOR THE ENVIRONMENT Disposal Of The Packing Material The transport and protective packaging has been selected from environmentally friendly materials and can be recycled. Ensure that any plastic wrapping, bags etc. are disposed of safely and kept out of reach of children as they can potentially be dangerous. Disposal of Old Appliance Ensure that the appliance presents no danger to children while being stored for disposal by taking off the doors and leaving the shelves in place.
WARNING & SAFETY INFORMATION Please read this manual carefully; it provides important information about the safety, installation use and maintenance of the appliance. This appliance must only be used for the purpose of which it is designed: the cool storage of food. Any other use must be considered improper and thus dangerous. The manufacturer cannot be considered responsible for any damage caused by improper, incorrect or unreasonable use.
PRODUCT DESCRIPTION Refrigerator Control Panel Halogen Lamp Multi Boxes Bottle Shelves Storage Shelves Glass Shelf Evaporation Tray Storage Shelves Glass Shelves Rubber Seal Vegetable Drawers Adjustable Feet 6
INSTALLATION PRODUCT CHARACTERISTICS When placing, moving or lifting the refrigerator: TECHNICAL DATA * * * * * * * * Do not place it in a horizontal position or tilted more than 40o. * Do not hold the door handle, pull the condenser at the back or touch the compressor unit. Total gross capacity: 354 L Refrigerator net capacity: 351 L Daily energy consumption: 0.49 kWh Monthly energy consumption: 14.
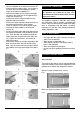
* Tilt the refrigerator to an angle of maximum 45o and unscrew the bottom hinge. This is done by removing the two screws holding the bottom hinge on the cabinet underside (C). * Remove the bottom dummy hinge in the opposite side in the same way as the upper dummy hinge was removed (D). * Reverse the dummy hinge and refit it on the opposite side of the cabinet. * Reverse the upper right hand hinge and refit it in the lower left hand corner of the cabinet. * Place the cabinet in the vertical position again.
To remove shelves: Door Storage Shelves Hold the right side of the shelf, Lift the left side with your left hand about 45o and pull the shelf towards you. When removing the shelves, start by removing the top one. The shelves in the door can hold bottles of up to 2 litres. They can be moved and placed throughout the entire height of the door. Storage Boxes To replace shelves: The storage boxes are ideal for all items of food. The tight fitting lids prevent drying out.
Control Panel 1. 2. 3. 4. 5. Refrigerator ON button Refrigerator OFF button Refrigerator ON light (green) “COOL” button Display showing the set temperature and error code 6. Refrigerator real temperature display button (increase button) 7. Refrigerator real temperature display button (decrease button) 8. Quick cooling ON light (blue) 9. Cooling fan ON light (yellow) 10. Cooling fan On/OFF button 11.
When the cooling fan is not switched on, the natural circulation of air within the refrigerator chamber will cause different temperature zones. This caused by the cold air sinking to the lowest section of the chamber. This should be kept in mind when loading the refrigerator (see Using the Refrigerator Efficiently. Alarm and Error Codes Error Codes Type Description E1 Temperature sensor fault in the refrigerator chamber Sensor has been damaged. Call a qualified technician.
Coldest Area DEFROSTING, CLEANING & MAINTENANCE The coldest area is directly above the vegetable drawers. Use this area for all delicate and highly perishable food e.g. Defrosting The Refrigerator The refrigerator automatically defrosts while the compressor is at a standstill. However, in some instances (e.g. over-loading the refrigerator chamber), the refrigerator may not defrost completely before the compressor restarts.
Door Seals Grease or oil should never be used on door seals as these will cause them to deteriorate and become porous over time. The door seals should be cleaned regularly with clean warm water and wiped dry with a soft cloth. After Cleaning Replace all the shelves and accessories in the refrigerator chamber. Place food back in the refrigerator chamber, close the appliance door and connect the power supply. Switch the refrigerator ON by pressing the button (1).
TROUBLE SHOOTING The following are a list of minor faults with instructions on how to rectify, these should be checked by the user: PROBLEM The appliance does not work REASON ACTION No power to the unit * make sure the plug is properly inserted into the socket * make sure there is electricity in the socket by plugging in another electric device, such as a night lamp. * make sure the power supply cord is not damaged.
WARRANTY We undertake to repair or replace, free of charge to you any part found to be faulty within the 2 year period from the date of purchase provided that:* The fault is, in our opinion, caused by defective workmanship, or material and not by accident, misuse, neglect or normal wear and tear. * Any manufacturing defect is reported to the stockist from whom you bought the appliance or directly to Waterford Stanley Service Department within 2 years of the date of purchase.