
Installation Instructions
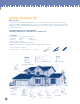

installing TimberCrest
®
i/s insulated siding
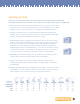
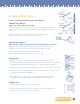
Snapping A Chalk Line
Start at the lowest corner of siding or sheathing on the house. Drive a nail partway
into the sheathing at a point 3" higher than the lowest corner. (Note: This will place
the siding 3/8" below the lowest point.) Stretch a chalk line from this nail to a
similar nail at the next corner of the house, being careful to make sure that the line
is level. Continue this process around the entire house.
Install The EasyStart Strip
Position the EasyStart strip with the top edge on the level chalk line. Fasten the
EasyStart strip to the wall. Use shims to fill any hollows which may occur in the
wall surface. It is important that the starter strip be installed straight and level.
As you add sections of starter strip, always leave 1/4" space between sections to
allow for expansion and contraction. Note: Leave approximately 1/4" between the
EasyStart strip and the EasyPost outside corner post.
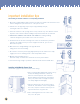
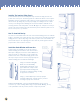
Installing Outside Corner Posts
Corner posts should extend 3/4" past the bottom of the EasyStart strip. Remember
to place the topmost fastener at the top of the topmost full nailslot. Center
remaining fasteners 8"-16" apart. Note: For a better finished appearance, remove
a 3/4" portion of the nail hem on both sides of the corner post prior to securing.
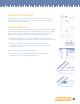
Installing J-channel
J-channel should be installed all along the top and sides of window and
door casings. Cut j-channels the required length plus twice the width of the
j-channel face for overlapping the j-channels at each corner. Place the j-channel
against the casing and secure it to the wall, allowing for free movement.
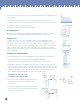
To trim the bottom of windows, and at the eave, j-channel can be used with the undersill
molding inside the j-channel. The j-channel & undersill combination will secure the cut
siding panel and help to keep the alignment straight. Dual undersill molding combines
both functions into one part. Cut and secure dual undersill similarly to using j-channels.
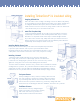
For Square Corners
Start by installing the bottom j-channel, removing a 3/4" notch from
each end. Install side j-channels by removing a 3/4" notch from the
top, and making a 3/4" drain tab at the bottom. Fold the tab under,
and into the bottom j-channel. Install the top j-channel by cutting a 3/4" drain
tab at both ends, and bending the drain tabs downward, and into the side j-channels.
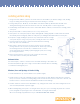
For Mitered Corners
Create mitered corners by cutting 45 degree
angles in the bottom end of the side j-channels,
and on both sides of the top j-channel. To
install, follow the methods described above.
13