
Installation Instructions


14
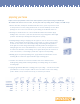
Installing The Insulated Siding Panels
Lock the insulated panel into the EasyStart strip and slide the vinyl panel into the
pocket of the corner post. The factory panel has a 3/4" foam setback so that only the
vinyl will go into the pocket when using a factory cut end. Finish the field cut end of
the first course by cutting the panel to proper length, and sliding it into the outside
corner post receiving channel allowing 1/4" for movement (Note: allow 3/8" in all
receiving channels if the temperature is under 40 degrees F). It may be necessary to
remove some of the insulation from the back of the panel to allow the panel to be set
into the corner posts, or j-channels.
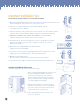
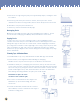
How To Seam And Overlap
The foam is set back 3/4" from both ends of the Insulated Siding panel. The adhesive
begins 2" back from each end of the foam. The correct way to seam two (2) Insulated
Siding panels is to slip the vinyl edge of the bottom portion of the seam between the
foam and the vinyl on the adjoining panel- then slide the panels together until the
proper foam-to-foam contact is achieved.
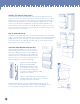
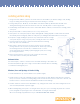
Installation Under Window and Crown Area
Several options are available too secure the topmost
Insulated Siding panel below the eaves. Each method
will require cutting the panel to the desired width, then
using a hot knife, or utility knife to clean enough foam
from the back of the cut Insulated Siding panel so that
the snap lock punch can be used to properly crimp the
Insulated Siding panel as illustrated below right.
Using an undersill molding (A):
Build out an undersill/utility
molding with a furring strip to the
proper dimension. Snap lock the
properly fit Insulated Siding panel,
and slide into undersill molding checking
for proper free movement.
Using a j-channel (B): Snap lock the properly fit
Insulated Siding panel, and slide into the j-channel
checking for proper free movement.
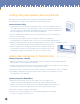
A Dual Undersill Molding, or Snap-in Crown Molding may also be used to
secure the top course of siding. When using a Snap-in Crown Molding, the top
of the panel will be nail slot punched, instead of snap-lock punched.
Note:
Foam-to-foam
contact is critical
for proper long
term weathering
and optimal
insulation value.
Dual-Undersill Molding
Slip-In Cover Molding
Remove foam with a
knife, then snap lock
punch panel every 6"- 8"