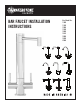
BAR FAUCET INSTALLATION INSTRUCTIONS 1300 1550 1800 Bar Model #s: 1300 1350 1500 1550 1600 1625 1800 1850 2500 1350 1500 1600 1625 1850 2500
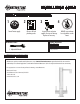
INSTALLATION GUIDE BEFORE YOU BEGIN YOUR INSTALLATION: 1 2 Turn off water supply. 3 Observe all local plumbing codes. Inspect waste and water supplies for signs of damage. Replace as necessary. REQUIRED TOOLS: 1. Adjustable Wrench 4 2. Phillips Screwdriver DO NOT use petroleum based products on this faucet.
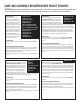
BAR FAUCET INSTALLATION 1. 2. A B C COUNTER OR SINK D E Slide escutcheon plate (A) and clear vinyl washer (B) onto threaded shroud (C) and up to base of faucet. 3. 4. F G Turn faucet to the desired handle position. Securely tighten nut with adjustable wrench. Slide washer (F) and thread the nut (G) onto threaded shroud. Hand tighten nut to underside of sink or counter. Fit flexible hoses (D, E) through hole on counter or sink. (No plumbers putty is required. Vinyl washer seals base).
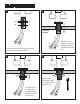
CONNECTING SUPPLY HOSES 1. Before connecting supply hoses, flush supply stops to clear any debris. Place a bucket underneath stops and run water for 5 to 10 seconds. Turn water off. 2. Carefully position hot and cold supplies so they will not interfere with other hoses. 3. Connect supply hoses (A) to supply stops (B). DO NOT use teflon tape or plumbers putty. Turn water back on and check for leaks. A B CLEANING AERATOR AND DEBRIS SCREEN 1. 2. B 3. 4. 5.
CARE AND CLEANING FOR WATERSTONE FAUCET FINISHES ATTENTION: Waterstone offers many finishes for it’s faucet product line. Every finish is unique and requires different techniques of care and cleaning. Find your faucet’s finish in sections below, then carefully read and follow directions for that finish. ABOUT YOUR FINISH: These finishes have a clear protective coating on them. Even though they have a protective coating, they are only considered semi-durable.
ABOUT YOUR FINISH: Weathered Copper - WC This finish is considered a Living Finish and has NO PROTECTIVE COATING on the surface. Living finishes are finishes that have a very shallow patina on their surface. Essentially, the finish is what nature would do to the surface over a long period of time. The finishes are intended to change with time and generally darken slightly where they are not being touched, and highlight where the high use points are on the fixture.