
User`s guide


Watlow EZ-ZONE
®
PM PID Controller • 108 • Chapter 9 Features
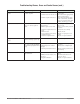
Lockout Security [SLoC] & [rloC]
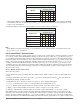
Factory Page Menus
Menus
Security Level
0 1 2 3 4 5
Custom Menu N N N N N Y
Lockout Menu* Y Y Y Y Y Y
Diagnostic Menu** N Y Y Y Y Y
Calibration Menu N N N N N Y
* Using lockout Method 1 with [SLoC] set to 0, all writable parameters within the control will be inhibited
(not writable) with two exceptions, [sloC] and [rloC]. As shown below, both of these parameters can al-
ways be seen and modified.
** Diagnostic Menu and all associated prompts are always visible and never writable
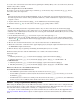
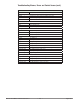
Lockout Security [SLoC] & [rloC]
Factory Page Menu Parameters
Parameters
Security Level
0 1 2 3 4 5
[LoC;O]
N Y Y Y Y Y
[loC;p]
N Y Y Y Y Y
[pas;e]
N Y Y Y Y Y
[rloC]
Y Y Y Y Y Y
[sloC]
Y Y Y Y Y Y
Note:
Using Method 1 Lockout all settings can be modified by anyone who knows how to find their way to the
[SLoC] and [rloC] parameters
Using Lockout Method 2 (Password Enable)
It is sometimes desirable to apply a higher level of security to the control where a password would be required
to access the control. If Password Enabled [pas;e] in the Factory Page under the [`loC] Menu is set to on,
an overriding Password Security will be in effect. Without the appropriate password, specified menus will re-
main inaccessible. Page and Menu access is defined in the Locked Access Level [loC;L] prompt. On the other
hand, a User with a password would have visibility restricted by the Read Lockout Security [rloC]. As an
example, with Password Enabled and the Locked Access Level [loC;L] set to 1 and [rloC] is set to 3, the
available Pages for a User without a password would be limited to the Home and Factory Pages (locked level
1). If the User password is entered all pages would be accessible with the exception of the Setup Page as de-
fined by level 3 access.
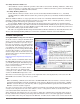
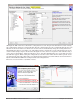
How to Enable Password Security
Follow the steps below:
1. Go to the Factory Page by holding down the Infinity ˆ key and the Advance
‰
key for approximately six
seconds.
2. Push the Down ¯ key one time to get to the [`loC] menu. Again push the Advance
‰
key until the Pass-
word Enabled [pas;e] prompt is visible.
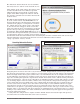
3. Push either the up or down key to turn it on. Once on, 4 new prompts will appear:
1. [loC;l], Locked Access Level (1 to 5) corresponding to the lockout table above.
2. [roll], Rolling Password will change the Customer Code every time power is cycled.
3. [pas;u], User Password which is needed for a User to acquire access to the control.
4. [pas;a], Administrator Password which is needed to acquire administrative access to the control.
The Administrator can either change the User and or the Administrator password or leave them in the de-
fault state. Once Password Security is enabled they will no longer be visible to anyone other than the Admin-
istrator. In other words the Lock Menu [`loC] is not available to a User. As can be seen in the formula that
follows either the User or Administrator will need to know what those passwords are to acquire a higher level