
User`s guide


Watlow EZ-ZONE
®
PM PID Controller • 5 • Chapter 1 Overview
You can assign more than one output to respond to a single instance of a function. For example, alarm 2
could be used to trigger a light connected to output 1 and a siren connected to digital output 5.
Input Events and Output Events
Input and output events are internal states that are used exclusively by profiles. The source of an event in-
put can come from a real-world digital input or an output from another function. Likewise, event outputs may
control a physical output such as an output function block or be used as an input to another function.
Getting Started Quickly
The PM control has a page and menu structure that is listed below along with a brief description of its pur-
pose.
Setup Page
Push and hold the up and down keys (¿ ¯) for
6 seconds to enter. (See the Setup Page for fur-
ther information)
Once received, a user would want to setup their control
prior to operation. As an example, define the input type
and set the output cycle time.
Operations Page
Push and hold the up and down keys (¿ ¯) for
3 seconds to enter. (See the Operations Page for
further information)
After setting up the control to reflect your equipment, the
Operations Page would be used to monitor or change run-
time settings. As an example, the user may want to see
how much time is left in a profile step or perhaps change
the autotune set point.
Factory Page
Push and hold the Infinity and the green Ad-
vance keys (ˆ
‰
) for 6 seconds to enter. (See
the Factory Page for further information)
For the most part the Factory Page has no bearing on the
control when running. A user may want to enable pass-
word protection, view the control part number or perhaps
create a custom Home Page.
Home Page
The control is at the Home Page when initially
powered up.
Pushing the green Advance key
‰
will allow the user to
see and change such parameters as the control mode, en-
able autotune and idle set point to name a few.
Profile Page
Push and hold the the green Advance key
‰
for
6 seconds to enter. (See the Profile Page for fur-
ther information)
If equipped with this feature a user would want to go
here to configure a profile.
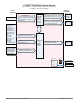
The default PM loop configuration out of the box is shown below:
• Analog Input functions set to thermocouple, type J
• Heat algorithm set for PID, Cool set to off
• Output 1 set to Heat
• Control mode set to Auto
• Set point set to 75 °F
If you are using the input type shown above, simply connect your input and output devices to the control.
Power up the control and push the up arrow ¿ on the face of the control to change the set point from the
default value of 75 °F to the desired value. As the Set Point increases above the Process Value, output 1 will
come on and it will now begin driving your output device. The PV function as shown in the graphic below is
only available with PM4/8/9 models.
Note:
The output cycle time will have a bearing on the life of mechanical relay outputs and can be different based
on the type of output ordered. The output cycle time can be changed in the Setup Page under the Output
Menu.
EZ-ZONE PM Default Configuration
Heat
Thermocouple Type J
Analog Input 1
PID
Controller
Heat
Loop 1
Input Sensor
Output
Function
Input
Function
Output 1
Process
Value
(PV)
Function
Off