INSTALLATION, OPERATION AND MAINTENANCE MANUAL Warning Please read carefully before proceeding with installation. Failure to follow attached instructions or operating parameters may lead to the product’s failure. ****************************************************************************************** Save manual for future reference. Model: HT-6-DM REVERSE OSMOSIS SYSTEM Watts Premier, Inc. Phone: 800-752-5582 Part # 191933 8716 W Ludlow Drive Suite #1 www.wattspremier.
Thank you for your purchase of a state of the art Reverse Osmosis (RO) water treatment system. Water quality concerns are becoming more of a focus for the public. You may have heard about contaminants in the drinking water, such as Arsenic, Chromium, Cryptosporidium or Giardia. There may also be some local water issues such as high levels of Lead and Copper. This Watts water treatment system has been designed and tested to provide you with high quality drinking water for years to come.
** Before installation, please take a moment to fill out the warranty card on page 17. Table of Contents Operational Parameters.................................................................................................................... 4 Contents of Reverse Osmosis System............................................................................................. 4 Installation & Startup Tools Recommended For Installation.............................................................................
Operational Parameters Do not use with water that is micro biologically unsafe or of unknown quality without adequate disinfection before or after the system. System is intended to be installed on the cold water line only. Operating Temperatures: Operating Pressure: pH Parameters: Iron: TDS (Total Dissolved Solids) Turbidity Maximum 100°F (37.8°C) Maximum 85 psi (6.0 kg/cm2) Maximum 11 Maximum 0.2 ppm < 1800 ppm < 5 NTU Minimum 40°F (4.4°C) Minimum 40 psi (2.
Plumbing Diagram and Parts List 1 Faucet 116146 2 Polishing Filter 100014 3 Storage Tank 119019 4 Tank Ball Valve 134039 5 Elbow Fitting 125031 6 Filter Housing Assy 113080 7 Adapt-a-Valve 560080 8 Elbow Check Valve 134011 9 Tee Fitting 125063 10 Drain Saddle 1/4” 164048 11 Shut Off Valve 134003 12 Fitting Adapter 125017 13 Membrane Housing 113101 14 Tee Fitting 125066 2 9 15 16 17 18 19 20 21 22 23 24 25 26 27 28 Yellow Tubing 1/4” Green Tubing 1/4” Blue Tubing 1/4” White Tubing 1/4” System Brack
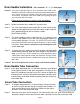
Drill a Hole for the Reverse Osmosis Faucet Marble Counter-top We recommend contacting a qualified contractor for drilling a hole in a marble counter-top. Counter Top / Porcelain & Stainless Steel Sink Note: Most sinks are pre drilled with 1 ¼” diameter hole that you can use for your RO faucet. (If you are already using it for a sprayer or soap dispenser, see step 1) Porcelain sinks are extremely hard and can crack or chip easily. Use extreme caution when drilling.
Installation of Faucet Step 5 Place the escutcheon chrome plate and the black rubber washer on the faucet shank. (Parts found in faucet parts bag). Step 6 Insert the faucet shank through the hole in sink and let it rest on the sink top. Step 7 From the underside of the sink, slide on the locating washer, lock washer and brass nut onto the shank. Check orientation of faucet then tighten brass nut securely.
Adapt-a-Valve Installation Caution: Water supply line to the system must be from the cold water supply line only. Hot water will severely damage your system.
Drain Saddle Installation - Fits standard 1 ¼” – 1 ½” drain pipes Caution: If you have a garbage disposal, do not install the drain saddle near it. Installation of the drain saddle must be either above the garbage disposal, or if a second sink drain is available, install it above the cross bar on the second drain. Installation of the drain saddle near a garbage disposal may cause the drain line to plug. Follow all local plumbing codes for your installation.
Tank Ball Valve Installation Step 19 Thread the plastic ball valve onto the tank fitting. Do not apply Teflon tape to fitting. Do not over tighten or the valve could crack. Yellow Tube Connection Step 20 Locate the 1/4” yellow tube in the parts bag. Insert one open end FIRMLY into the open tee fitting attached to the LEFT side of the final stage filter. Use a 5/8” wrench to tighten the white plastic nut securely. Step 21 Position tank in desired location.
Congratulations! You have completed the installation of your new Reverse Osmosis system. Please Follow the Startup Instructions. Start up Instructions Turn on the incoming cold water at the angle stop valve and the Adapt-a-Valve. Check the system for leaks and tighten any fittings as necessary. (Check frequently over the next 24 hours to ensure no leaks are present).
System Maintenance Six Month Maintenance Items needed: √ Stage 1 - Sediment Filter (part #: 104017) √ Stage 2 & 3 - Carbon Block Filter (part #: 101009) Step 1 Turn off the incoming water supply to the RO at the feed water valve. (Follow the green tube away from the RO system to find the valve.) Close ball valve on the storage tank and open the RO Faucet to depressurize.
System Maintenance Continued... Annual Maintenance Items needed: √ Stage 1 - Sediment Filter (part #: 104017) √ Stage 2 & 3 - Carbon Block Filter (part #: 101009) √ Stage 6 - Final In-line Filter (part #: 100014) Note: Sanitizing of unit is recommended. Step 1 Perform steps 1 through 5 in the Six Month System Maintenance (Page 12). If not sanitizing the system skip to step 8. Note: Remove the RO membranes from their housings and rest them in a clean sanitary place.
This reverse osmosis system contains a replaceable component (the RO membrane) which is critical to the efficiency of the system. Replacement of this reverse osmosis membrane should be with one of identical specifications as defined by Watts to assure the same efficiency and contaminant reduction performance. Membrane Replacement Membranes have a life expectancy between 2 and 5 years, depending on the incoming water conditions and the amount the RO system is used.
Check Air Pressure in the Tank Important: Check air pressure only when tank is empty of water! Check air pressure in the storage tank when you notice a decrease in available water from the RO system. Air can be added with a bicycle pump using the schrader valve that is located on the lower side of the tank behind a blue plastic cap. Step 2 Open the RO Faucet and allow water to drain from the tank until it is completely empty. SI Turn off the cold water supply to the RO and unplug transformer.
TECHNICAL & WARRANTY INFORMATION Performance Data Sheet HT-6-DM Watts Premier Inc. 8716 W Ludlow Drive Suite #1 Peoria, AZ 85381 (480) 675-7995 wpmail@wattsind.com GENERAL USE CONDITIONS: 1. System to be used with municipal or well water sources treated and tested on regular basis to insure bacteriological safe quality. Do not use with water that is microbiologically unsafe or unknown quality without adequate disinfection before and after the system. 2. Operating Temperature: Maximum: 100°F (40.
WARRANTY REGISTRATION Thank you for selecting Watts Premier for your water filtration needs. 4 Ways to Register 1. Online at www.wattspremier.com Register your product online and receive a 5% discount on your next on-line order. 2. Call in your information 1-800-752-5582 Call and we will enter your information. 3. Fax in your information 623-866-5666 Registering will ensure you receive FREE Fax this form directly to us. 4. Mail in the information. Please complete the form below.
WARRANTY REGISTRATION Please Fill out and keep for your Records First Name:_________________________ Last Name:____________________________ Address: ________________________________________ City: ____________________ State/Prov:______________________________ Zip/Postal Code: ___________________ Country: USA CANADA MEXICO Phone # ______-__________ -__________ Date of Purchase: ___________________ OTHER ____________ Email Address: ______________________ Date of Install: _______________________ Insta
Service Record Date of Purchase:__________ Date of Install:___________ Installed by:__________________ Date 1st stage Sediment (6 months) 2 & 3 stage Carbon (6 months) NOTES: Page 19 Final Filter Carbon (1 year) TFM Membranes (2-5 years)
Limited Warranty What your Warranty Covers: If any part of your WATTS Reverse Osmosis System is defective in workmanship (excluding replaceable filters and membranes), return unit after obtaining a return authorization (see below), less tank, within 1 year of original retail purchase, WATTS will repair or, at WATTS’S option, replace the system at no charge. How to obtain Warranty Service: For warranty service, call 1-800-752-5582 for documentation and a return authorization number.