INSTALLATION, OPERATION AND MAINTENANCE MANUAL Warning Please read carefully before proceeding with installation. Your failure to follow any attached instructions or operating parameters may lead to the products failure and possible damage to property.
Thank you for your purchase of a state of the art Watts Premier Reverse Osmosis (RO) water treatment system. Water quality concerns are becoming more of a focus for the public. You may have heard about contaminants in the drinking water, such as Arsenic, Chromium, Cryptosporidium or Giardia. There may also be some local water issues such as high levels of Lead and Copper. This Watts Premier water treatment system has been designed and tested to provide you with high quality water for years to come.
With proper installation and maintenance, this system will provide you with high quality water for years to come. All of Watts Premier’s water enhancement products are rigorously tested by independent laboratories for safety and reliability. If you have any questions or concerns, please contact our customer service department at 1-800-752-5582 (outside USA 480-675-7995) or refer to our on-line trouble shooting at www.premierH2o.com. Table of Contents Operational Parameters.................................
Operational Parameters Operating Temperatures: Operating Pressure: pH Parameters: Iron: TDS (Total Dissolved Solids) Turbidity Maximum 100°F (37.8°C) Maximum 85 psi (6.0 kg/cm2) Maximum 11 Maximum 0.2 ppm < 1800 ppm < 5 NTU Minimum 40°F (4.4°C) Minimum 40 psi (2.80 kg/cm2) Minimum 2 Hardness: Recommended hardness should not exceed 10 grains per gallon, or 170 ppm. System will operate with hardness over 10 grains but the membrane life will be shortened.
Drill a Hole for the Faucet in a Porcelain Sink Note: Most sinks are predrilled with 1 ½” or 1 ¼” diameter hole that you can use for your RO faucet. (if you are already using it for a sprayer or soap dispenser, see step 1). Porcelain sinks are extremely hard and can crack or chip easily. Use extreme caution when drilling. Premier accepts no responsibility for damage resulting from the installation of faucet.
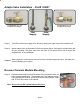
Wave Faucet Installation - Part# 116022 Note: If using the Wave Air Gap Faucet (pictured), a 1 1/4” hole will be required. Step 6 Gather and identify the Wave faucet pieces. Air Gap Faucet • • • • Faucet assembly Black Shank Nut Spacer Gasket Step 7 Remove black stem nut and insert the three tubes (air gap faucet) through the white gasket with the groove on the gasket toward the faucet base. Step 8 Insert the three tubes through the 1 1/4” hole in the sink.
WATTS Premier Chrome Top Mount & Top Mount Monitored Faucet Installation Mounting Hole Size Torque on Toggle Bolt Minimum Maximum 1.00” 1.25” 5lb.in. (max) Watts Faucets P/N: 116000 Chrome (Non-Monitored) P/N: 116072 Brushed Nickel (Non-Monitored) P/N: 116074 Chrome (Monitored) Gather and identify the faucet pieces. Step 6 Remove faucet base & faucet spout from their respective plastic bags. From above the sink, feed the faucet tubing & toggle bolt down through the 1¼” mounting hole in the sink.
Adapta Valve Installation - Part# 134007 Configuration for 3/8” compression fittings Configuration for 1/2” compression fittings Hot Supply Cold Supply Step 11 Turn off the cold water supply to the faucet by turning the angle stop valve completely off. Step 12 Attach adapta valve as illustrated in the three photos above, choosing the configuration that fits your plumbing. The green tube from inlet side of RO module will be cut to length and attached later in the installation.
Drain Saddle Installation - Part# 164016 Drain Saddle fits standard 1 ¼” – 1 ½” drain pipes Step 14 Gather the pieces of the drain saddle 1 Black compression nut 1 Semicircle bracket with opening 2 Screws 1 Foam washer 2 Nuts for screws 1 Semicircle bracket Step 15 The small square black foam gasket with a circle cut out of the middle must be applied to the inside of the drain saddle. Remove sticky tape backing and stick to the drain saddle as shown.
Connect Blue Tube from TANK port on RO Module to the Tank Step 19 Position tank in desired location. Stand it upright or lay it on its side (using the black plastic stand). Measure the blue tube from the RO module port marked TANK over to the tank and cut it to desired length. Insert the blue 3/8” tube into the compression nut as far as it will go. Tighten the compression nut securely with a wrench.
3/8” Black Tube Connection from faucet Note: The tubing must be as SHORT and STRAIGHT as possible to the drain saddle, making a downward slope from module to drain saddle to allow for proper drainage. Step 24 Measure the black tube from faucet to the black drain saddle and make a straight cut through tube. Step 25 Remove black plastic nut from drain saddle. Slip black tube through black nut.
Connect the Red Tube from Faucet to RO Module Step 26 Insert the red 1/4” tube from the faucet into the port on the module marked “DRAIN”. Make sure the tube is pushed in all the way to the tube stop. Connect the Blue Tube from the Faucet to RO Module Step 27 Insert the blue 3/8” tube from the faucet into the port on the module marked “FAUCET”. Make sure the tube is pushed in all the way to the tube stop. Start up Instructions Step 1 Turn on the incoming cold water at the angle stop valve.
6 Month System Maintenance Part Number Step 5 Clean all filter housings (bowls) with a mild soap solution and rinse with water. Check O-rings and lubricate with water soluble lubricant. KY Jelly® , Canola oil and other water based lubricants can be used, petroleum based lubricants (such as Step 6 The sediment filter has a cloth like appearance. It should be in the 1st Stage on the side with tubing connections. Caution: Check O-rings to make sure they are still in place.
Annual Maintenance Step 1 Annual sanitizing of unit is recommended. Turn off incoming water supply. Remove sediment & carbon filters from filter housings. Step 2 Open Membrane vessel and remove the membrane from the membrane vessel. Replace empty membrane vessel onto the unit. Step 3 Leave filters out, replace the last two (of three) empty filter housings (hand tight) onto unit.
Step 3 Pull firmly on the membrane to remove from the housing and discard. Unwrap new membrane and lubricate the o-rings with water soluble lubrication such as KY Jelly ® before inserting into housing. Insert end with the two black O-rings into the cap. Twist the membrane as you push firmly into the cap. (25 GPD membrane part #: 110009) (50 GPD membrane part #: 110019) Step 4 Step 5 Replace the vessel onto the cap by turning clockwise. Tighten securely.
Check Air Pressure in the Tank Note: Check air pressure when tank is empty of water! Check air pressure in the tank when you notice a decrease in available water from the RO system. Step 1 It is recommended that you drain the tank of water, and then pump up the RO tank in order to ensure all water is out of the tank. Air can be added with a bicycle pump. Step 2 Once all water in the tank is purged out, check air pressure of the tank. If you added air to the tank, it will be higher than 5 - 7 psi.
TROUBLE SHOOTING Problem Cause Solution 1. Low/Slow Production Low Water Pressure Crimps in tubing Clogged pre-filters Fouled membrane Assure a minimum of 40 psi incoming water pressure. Premier sells a booster pump if home water pressure is low. Maker sure water supply is turned on and Adapta Valve is all the way open Check tubing and straighten or replace as necessary. Replace pre-filters. Replace membrane and clean flow restrictor. 2.
Arsenic Fact Sheet Arsenic (As) is a naturally occurring contaminant found in many ground waters. Arsenic in water has no color, taste or odor. It must be measured by an arsenic test kit or lab test. Public water utilities must have their water tested for arsenic. You can obtain the results from your water utility contained with in your consumer confidence report. If you have your own well, you will need to have the water evaluated.
California Certification Page 19
Performance Data Sheet WP-4BVC Watts Premier Inc. 8716 W Ludlow Drive Suite #1 Peoria, AZ 85381 GENERAL USE CONDITIONS: 1. System has been independantly tested for the removal of microbiologically contaminated water. The system is not intended for the treatment of water that has an obvious contamination source, such as raw sewage. This system is not intended to convert wastewater to microbiologically safe drinking water. 2. Operating Temperature: Maximum: 100°F (40.5°C) Minimum: 40° (4.4°) 3.
Performance Data Sheet WP4-50BVC Watts Premier Inc. 8716 W Ludlow Drive Sutie #1 Peoria, AZ 85381 GENERAL USE CONDITIONS: 1. System has been independantly tested for the removal of microbiologically contaminated water. The system is not intended for the treatment of water that has an obvious contamination source, such as raw sewage. This system is not intended to convert wastewater to microbiologically safe drinking water. 2.
Page 22
Other Products from Watts Premier Watts Premier has other fine water filtration products and accessories to enhance your water and to compliment your existing RO System. Listed on the next several pages are only a few of the items we offer. Visit our website at www.premierH2o.com or call our Customer Service Representatives at 1-800-752-5582 (inside USA) 1-623-866-5666 (outside USA) for more products.
Wave Faucets by Watts Premier allow for a variety of choices to match your kitchen decor. Available colors include: Part No. 116026 Stainless Steel Part No. 116022 Chrome Part No. 116010 White Part No. 116002 Black on chrome Top Mount Faucets by Watts Premier These attractively designed faucets feature a long reach spout to compliment all styles of kitchen decor. The unique top mount design allows for easy above counter installation.
Removing chlorine from your shower Special Chlorgon & KDF media – More effective then carbon medias with hot water applications in the removal of the following. √ √ √ √ √ Iron oxide (rust water) Free Chlorine (CL-) Combined Chlorine (Sodium Hypochlorite) √ Dirt, sediment √ Odors Hydrogen Sulfide (Rotten egg smell) Plus, its pH balanced.
WARRANTY REGISTRATION Thank you for selecting Watts Premier for your water filtration needs. 4 Ways to Register 1. Online at www.premierH2o.com Register your product online and receive a 5% discount on your next online order, Plus receive reduced shipping. 2. Call in your information 1-800-752-5582 Call and we will enter your information. 3. Fax in your information Fax this form directly to us. 623-866-5666 4. Mail in the information.
WARRANTY REGISTRATION Please Fill out and keep for your Records First Name:_________________________ Last Name:____________________________ Address: ________________________________________ City: ____________________ State: _______________________________________ Zip Code: ___________________ Country: USA CANADA MEXICO OTHER ____________ Phone # ______-__________ -__________ Email Address: ______________________ Date of Purchase: ___________________ Date of Install: _______________________ Insta
Service Record Serial No.
Limited Warranty What your Warranty Covers: If any part of your WATTS PREMIER Reverse Osmosis System is defective in workmanship (excluding replaceable filters and membranes), return unit after obtaining a return authorization (see below), less tank, within 3 year of original retail purchase, WATTS PREMIER will repair or, at WATTS PREMIER’S option, replace the system at no charge. How to obtain Warranty Service: For warranty service, call 1-800-752-5582 for a return authorization number.