
Service manual


Page 9
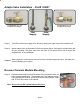
Thread the plastic elbow (supplied in the parts bag) onto the stainless
steel connection on the top of tank. Tighten using an adjustable
wrench. Do not over tighten as plastic could crack.
Step 17
Step 18
Wrap (7 to 12 turns) Teon tape clockwise around the male pipe
threads (MPT) on the Stainless Steel tting on top of the tank.
Tank Elbow Installation - Part# 125032
Do not Teon tape the plastic elbow threads as this may cause
leaks.
Caution:
Do not let the tape cover the opening.Note:
Drain Saddle ts standard 1 ¼” – 1 ½” drain pipes
Drain Saddle Installation - Part# 164016
Step 14
Step 15
Step 16 Drill a ¼” hole through the drain pipe at least 1 ½” above the nut of the
P-trap to allow for the removal of the P-trap if necessary. Assemble
the drain saddle around the drain pipe. Position the drain saddle over
the drilled hole in pipe. Insert screw driver into the opening of the
drain saddle and align with drilled hole in drain pipe. Using Philips
screw driver tighten screws evenly and securely on both sides of the
drain saddle. Attach black compression nut, but do not tighten at
this time. The black tubing will be installed later.
The small square black foam gasket with a circle cut out of the middle
must be applied to the inside of the drain saddle. Remove sticky tape
backing and stick to the drain saddle as shown.
1 Black compression nut
1 Semicircle bracket with opening
2 Screws
1 Foam washer
2 Nuts for screws
1 Semicircle bracket
Gather the pieces of the drain saddle
Caution:Do not over tighten the screws. It may crack the drain saddle.