
Onix Tubing Installation Manual


page 44 Watts Radiant: Onix Installation Manual
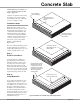
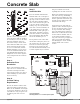
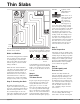
Perimeter Banding
Four, five or six inch Onix spacing is
frequently used along outside exposed
perimeter walls. These high-density
spacing areas are called perimeter
bands and tubing is generally spaced
half the main spacing. Banded areas
range in width from two to eight feet,
with the wider bands generally used in
front of taller exposed walls with a
high percentage of glass. A good rule
of thumb is to use a perimeter band
width of 50% to 75% of the height of
the wall. Most banded widths will be 4
ft. wide or half a standard wall height.
For example, in a home with 12" spac-
ing in the main floor area, a 6’ 8" patio
door would have radiant tubing on 6"
centers a minimum of 40"—48" in front
of the door.
Tools and Materials
Required
It is a good idea to make sure all mate-
rials are present and in good working
order before beginning a radiant instal-
lation. The following is a list of the
most common items needed for a typi-
cal Thin Slab installation.
1. RadiantWorks Reports.
These reports will ensure the proper
amount of tubing is installed in each
area, along with the correct manifold
size.
2. Onix tubing and corresponding
number of Watts Radiant Onix
Clamps.
Each Onix TorqueTite clamp will
require an in.-lb. torque wrench for
installation, while the SelfTite
clamps need a pair of SqueezeTite
Pliers. See manifold assembly sec-
tion for more details. The number of
Onix coils on the jobsite should cor-
respond to the number listed in the
Zone List report.
3. Manifold.
Only use manifolds provided by
Watts Radiant or Watts Radiant
manifold components for field con-
structed manifolds.
4. Unwinder.
A required component for easily
unrolling each precut Onix coil
without kinks and twist.
5. Field Repair Kit.
Each kit will contain two barb-by-
barb splices and four Onix Clamps.
6. Manifold Mounting Bracket.
Each bracket can be used to tem-
porarily or permanently mount each
manifold pair to the floor or wall.
Use Watts Radiant Manifold brack-
ets or SnapClips to hold manifolds.
7. Watts Radiant staple gun, staples
and NailTites.
8. Pressure test kit.
Each manifold pair must be pressure
tested. This helps ensure each Onix
connection has been performed cor-
rectly and to make sure no addition-
al damage has been done to the tub-
ing during installation.
9.Installation Accessories
a. Spray Paint: For marking
out zones and subzones,
as well as areas not to be
heated.
b. Electrical Tape: For
temporarily mounting the
manifolds or taping ends of
tubing together.
c. Cable Ties, ClipTies,
Screw Clips or other
fasteners.
Fasteners
Although the Watts
Radiant staple gun is
the most useful
attachment tool,
other fasteners are
available for areas
where the staple gun
can not reach. Watts
Radiant s NailTites
are used to secure Onix at turns and
bends and in areas inaccessible to the
staple gun. Both staples and NailTites
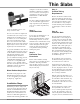
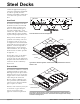
Screw Clips
Foam board Staple
Return
rn
Manif
if
old
ld
Supply
ly
Manif
if
old
ld
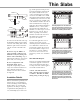
Thin Slabs
Supply Manifold
Return Manifold