
Install Instructions


IS-N170-M3
Series N170-M3 and LFN170-M3
Hot Water Master Tempering Valves
Installation Instructions
Installation should be in accordance with acceptable plumbing prac-
tices. Flush all pipes thoroughly before installation. Installation and field
adjustment are responsibility of the installer and shall be carried out per
following installation instructions.
1. Valves are to be installed as close to building inlet supply as possible
to prevent/minimize pressure fluctuations.
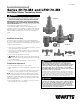
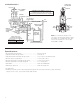
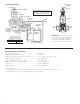
2. Valve body can be installed in multiple positions, see below. Make
sure that the union nuts and tailpieces are tightened securely if you
are using checkstops.
3. Connect inlets and outlet and check for leaks.
4. CAUTION: When N170-M3 or LFN170-M3 supplies tempered
water to self-closing and/or solenoid valves, provide a shock absorb-
er on the discharge line.
5. Before use, check discharge temperature. Reset if necessary
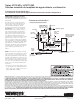
Temperature Adjustment
1. Turn off recirculation pump (if one is in the system).
2. Open enough fixtures to meet the minimum flow requirement of the
valve.
3. Loosen the lock nut. Turn temperature adjustment screw clockwise
to decrease or counterclockwise to increase outlet temperature.
NOTE: Please allow valve temperature to stabilize in before making
your next adjustment. Watts recommends that a temperature gauge is
installed on the tempered line and be checked at least monthly under
normal flow conditions. The gauge must be installed at least 6 ft. away
from the tempering valve.
4. When desired temperature is set, tighten the lock nut. Turn recircu-
lation pump back on. Close open fixtures.
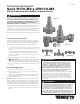
LFN170-M3
N170-M3 CSUT
!
Watts Hot Water Master Tempering Valves cannot be used for
tempering water temperature at fixtures. Severe bodily injury (i.e.,
scalding or chilling) and/or death may result depending upon system
water pressure changes and/or supply water temperature changes.
ASSE standard 1016, 1069 or 1070 listed devices such as Watts
Series MMV, LFMMV, USG, LFUSG, L111 or LFL111 valves should be
used at fixtures to prevent possible injury.
The Watts Hot Water Tempering Valves are designed to be installed at
or near the boiler or water heater. They are not designed to compensate
for system pressure fluctuations and should not be used where ASSE
standard 1016, 1069 or 1070 devices are required. These Watts valves
should never be used to provide “anti-scald” or “anti-chill” service.
Need for Periodic Inspection: Periodic inspection by a licensed
contractor is recommended. Corrosive water conditions, tempera-
tures over 210°F, unauthorized adjustments or repair could render
the valve ineffective for service intended. Regular checking and
cleaning of the valves internal components and checkstops helps
to assure maximum life and proper product function. Frequency of
cleaning depends upon local water conditions.
WARNING
!
WARNING
!
ENGLISH INSTRUCTIONS
You are required to thoroughly read all installation instructions and
product safety information before beginning the installation of this prod-
uct. FAILURE TO COMPLY WITH PROPER INSTALLATION AND
MAINTENANCE INSTRUCTIONS COULD RESULT IN PRODUCT
FAILURE WHICH CAN CAUSE PROPERTY DAMAGE, PERSONAL
INJURY AND/OR DEATH. Watts is not responsible for damages result-
ing from improper installation and/or maintenance.
Local building or plumbing codes may require modifications to the
information provided. You are required to consult the local building and
plumbing codes prior to installation. If this information is not consistent
with local building or plumbing codes, the local codes should be fol-
lowed.
WARNING
!
FRONT OUTLET
BACK OUTLET TOP OUTLET