
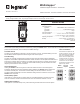
Installation Manual


2
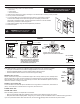
#12 – #14 AWG
Cu Wire Only
WIRING
21
/RDG
/LQH
*URXQG
1HXWUDO
/RDG
+RW
Single-switch Wiring Three-way Wiring
When using a three-way application,
lights may be turned on from either
switch, but can only be turned off at
the switch that turned them on.
21
/LQH
/RDG
*URXQG
21
/RDG
/LQH
*URXQG
1HXWUDO
/RDG
+RW
Wire insert
Optional
wire wrap
Insert or wrap wire as shown and
tighten screw in the clockwise direction.
Strip Gauge
1/2"
12.7mm
SWITCH ADJUSTMENT
Enter Settings Mode by pressing the Calibration Button (located on the left, behind the faceplate).
• If no input occurs within four seconds the display flashes then moves to the next setting.
• Press the Calibration Button to view the settings without making changes.
• Press the ON/OFF button within four seconds to change the setting.
DELAY: 5 min. to 12 hr.
DELAY sets the time-out period. The selections begin at the currently set time (3 hours, default). When
the time is less than an hour, the time increases by 5 minutes each time you press the ON/OFF button.
When the time is more than an hour, it increases by 15 minues. When the selection passes 12 hours, it
restarts the selection scrolling at 5 minutes.
SCROLL: Up or Down (dn)
To have the user’s time override options decrease from a longer time to a shorter time, set Scroll for dn
(down). To increase from a shorter time to a longer time, set Scroll for UP.
FLASH: ON or OFF
SOUND: ON or OFF
When the setting selection is complete the unit will either:
• Beep once and display END if the calibration button is being held; release the button to continue.
• Beep three times while it displays END. This gives you a chance to press the ON/OFF button to restart the setting procedure.
If you don’t press either button within three seconds, the unit exits the Settings Mode and resumes its previous state.
TS-400
ON
1
LCD
Display
ON/OFF
Button
Calibration
Button
INSTALLATION
1. Connect the existing wires to the switch terminals.
• Hot to Line;
• Load to Load;
• Ground to Ground.
2. Attach the time switch to the wall by mounting it in the wall box with 2 mounting screws provided.
3. Turn on power to the time switch
4. 7-15 seconds after power is supplied to the time switch, it will be ready to function.
The time switch beeps and the word OFF appears in the display. Push the ON/
OFF switch to activate the lights. The timer begins its countdown. Push the ON/OFF
switch during countdown to turn the lights off.
5. Select feature settings using the Switch Adjustment procedures.
6. Install cover plate.
WARNING: TURN THE POWER OFF AT THE
CIRCUIT BREAKER BEFORE WIRING.
WARNING: BE SURE THE GROUND
WIRE IS SECURELY CONNECTED.