Introduction The WT 2200 is a wearable data entry system consisting of a laser bar code scanner, usually worn on the operator’s fingers or back of hand, and a wrist computer worn on the operator’s forearm. The detachable components work equally well for right- and left-handed individuals. Detachable personal mounts allow multiple operators to share both scanner and wrist computer without having to use the same mount.
Parts of the WT 2200 System
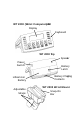
WT 2200 (Wrist Computer)ont Fr Display Keyboard WT 2200 Top Speaker Power Switch Lithium-Ion Battery Battery Latch Battery Char ging Contacts WT 2200 Wrist Mount Adjustable Straps Snap-On Bar
Installing and Charging the Battery The wrist computer and scanner are powered by a Lithium- Ion battery pack. The pack provides power for a typical 8- hour shift. Note: Before using the wrist computer, install and fully charge the Lithium-Ion battery pack. To install the battery pack in the WT 2200: 1. Insert the battery pack, base first, in the battery compartment.
Battery Latch Battery Pack Base 2. 3. Notch Battery Compartment Line up the pack’s locking mechanism with the notch in the battery compartment wall by sliding the battery latch, and press the pack into place. Release the battery latch to lock in place.
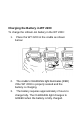
Charging the Battery in WT 2200 To charge the Lithium-Ion battery in the WT 2200: 1. Place the WT 2200 in the cradle as shown below: 2. The cradle’s CHARGING light illuminates (RED) if the WT 2200 is properly seated and the battery is charging. 3. The battery requires approximately 2 hours to charge fully. The CHARGING light changes to GREEN when the battery is fully charged.
4. To remove the WT 2200 from the cradle, tilt the WT 2200 upward and pull out. For more information on the CS 1000 Cradle, refer to the CS 1000 Single-Slot Cradle QRG, p/n 70-16237- xx, or the CS 1000 4-Slot Cradle QRG, p/n 70-17661- xx. Charging the Spare Battery Spare battery packs can be charged separate from the WT 2200. To charge a spare battery pack in the cradle: 1. 2. Insert the pack in the cradle’s spare charging slot. The CHARGING light illuminates red.
3. The spare pack is charged in approximately two hours, even if the WT 2200 is charging at the same time. The CHARGING light changes to green when the battery is fully charged.
Assembling the WT 2200 System To assemble the WT 2200 (wrist computer): 1. Place the WT 2200 wrist computer onto the wrist mount, facing you. Be sure the mount is oriented so that the longer strap will be further up the forearm. 2. Snap the bar over the WT 2200 using the snaps on either side of the mount. The straight part of the bar should lay across the front of the WT 2200; the curved part in back.
Note: The snaps on the wrist mount act as a tear-away device allow ing the wrist computer to detach from the mount if it catches on an object.
2. 2. Plug the cable connector from the WT 2200 in the interface port on the back of the scanner. Place the WT 2200 on your arm: a. Slide the wrist mount on your arm, so that the WT 2200 wrist computer faces you.
Pull the straps through the buckles so the wrist mount is secure but not tight.
a. Use the Velcro to secure the straps. 2. Assemble and mount your scanner. Power Once the battery pack is fully charged, you are ready to use the wrist computer. To power the wrist computer on, press the power switch on top of the WT 2200.
Display Light and Contrast To turn the display light and keypad backlight on, press LAMP (Left Alpha and Help). To adjust the contrast: • • press FUNC and SPACE to darken the contrast, press FUNC and BKSP to lighten the contrast.
Communicating with the Host Using the Cradle The CS 1000 cradle is used to perform communications with a host PC. To set up the cradle for operation: 1. Plug one end of a null modem cable (p/n 59846-03-00) into the communications port located on the left end of the cradle. 2. Connect the other end of the cable to the host computer’s serial (COMM) port. 3.
_ through the ChameleonRF IEEE 802.11b radio network. For information on performing radio communications, refer to the WT 2200 Product Reference Guide.
Data Entry Using the Keyboard The keyboard consists of two types of keys: alphanumeric character keys and modifier keys. Most keys are self- explanatory. Some guidelines for using the keyboard include: • • Press keys one at a time. Pressing two keys simultaneously produces an error. The default keyboard produces numbers; to produce letters, press the left Alpha Shift and the appropriate key to produce the letters in purple, and the right Alpha Shift to produce the letters in green, as shown below.
Alpha Shift Left Alpha Shift Right Alpha Shift • Use the modifier keys, FUNC, SHIFT, and CTRL, in combination with the character keys to produce other characters or to issue commands. Refer to documentation for your application for more information. Cursor position is controlled by the Up Arrow , Down Arrow , Left Arrow , and Right Arrow keys.
Mount The WT 2200 can be removed from the wrist mount for use by other operators. To remove the WT 2200: 1. Detach the cable connection to the scanner. 2. Unsnap the bar securing the wrist computer. 3. Lift the WT 2200 out of the mount.
Cleaning Wrist Computer To clean the wrist computer, use a clean, soft cloth dampened with a mild cleaner such as soap and water. Do not use abrasive paper, cloth, or abrasive/corrosive cleaners. Clean the keypad and scanner triggers, and wipe the display window with lens tissue. Wrist Mount Remove the bar from the wrist mount. Hand wash the fabric mount with warm water using a mild detergent and air dry (see tag on mount for washing instructions).
Service Information Before you use the unit, it must be configured to operate in your facility’s network and run your applications. If you have a problem running your unit or using your equipment, contact your facility’s Technical or Systems Support. If there is a problem with the equipment, they will contact the ChameleonRF Support Center: United States 1-866-CHAMRF2 Warranty ChameleonRF Inc.. (“ChameleonRF”) manufactures its hardware products in accordance with industry-standard practices.
(iv) which has been used other than in accordance with the product operating and handling instructions. Preventive maintenance is the responsibility of customer and is not covered under this warranty. Wear items and accessories having a ChameleonRF serial number, will carry a 90-day limited warranty. Non-serialized items will carry a 30-day limited warranty.
substantial discount during warranty period. General Except for the warranties stated above, ChameleonRF disclaims all warranties, express or implied, on products furnished hereunder, including without limitation implied warranties of merchantability and fitness for a particular purpose.
Ergonomic Recommendations Caution: In order to avoid or minimize the potential risk of ergonomic injury follow the recommendations below. Consult with your local Health & Safety Manager to ensure that you are meeting with your company’s safety programs to prevent employee injury.
Regulatory Information Radio Frequency Interference Requirements This device has been tested and found to comply with the limits for a Class B digital device pursuant to Part 15 of the Federal Communications Commissions Rules and Regulation. These limits are designed to provide reasonable protection against harmful interference when the equipment is operated in a commercial environment.
• Connect the equipment into an outlet on a circuit different from that which the receiver is connected. • Consult the dealer or an experienced radio/TV technician for help. This device complies with FCC Part 15. Operation is subject to the following two conditions: (1) this device may not cause harmful interference and (2) this device must accept any interference received, including interference that may cause undesired operation.
RF Safety Statement For body worn operation, this equipment has been tested and meets FCC RF exposure guidelines when used WAV accessories supplied or designated for this product. Use of other accessories may not ensure compliance with FCC exposure guidelines. This equipment is designed to be worn on the operator’s wrist. Modification of the wrist mount for use on any other part of the body may violate FCC Exposure Guidelies. See “Assembling The WT2200 System” for the proper procedure. WAV Inc.
Applicable Standards • EN 55 022 - Limits and Methods of Measurement of Radio Interference Characteristics of Information technology Equipment • EN 50 082-1:1997 - Electromagnetic Compatibility - Generic Immunity Standard, Part 1: Residential, commercial, Light Industry • IEC 1000-4-2(1995-01) - Electromagnetic compatibility (EMC) Part 4:Testing and measurement techniques - Section 2: Electrostatic discharge immunity test.
of procedures other than those specified herein may result in hazardous laser light exposure.
In accordance with Clause 5, IEC 0825 and EN60825, the following information is provided to the user: ENGLISH CLASS 1 CLASS 1 LASER PRODUCT CLASS 2 LASER LIGHT DO NOT STARE INTO BEAM CLASS 2 LASER PRODUCT DANISH KLASSE 1 KLASSE 1 LASERPRODUKT KLASSE 2 LASERLYF SE IKKE IND I STRÅLEN KLASSE 2 LASERPRODUKT DUTCH KLASSE 1 KLASSE-1 LASERPRODUKT KLASSE 2 LASERLICHT NIET IN STRAAL STAREN KLASSE-2 LASERPRODUKT FINNISH LUOKKA 1 LUOKKA 1 LASERTUOTE LUOKKA 2 LASERVALO ÄLÄ TUIJOTA SÄDETTÄ
LUOKKA 2 LASERTUOTE FRENCH CLASSE 1 PRODUIT LASER DE CLASSE 1 CLASSE 2 LUMIERE LASER NE PAS REGARDER LE RAYON FIXEMENT PRODUIT LASER DE CLASSE 2 GERMAN KLASSE 1 LASERPRODUKT DER KLASSE 1 KLASSE 2 LASERSTRAHLEN NICHT DIREKT IN DEN LASERSTRAHL SCHAUEN LASERPRODUKT DER KLASSE 2
Patent Information Patents This product is covered by one or more of the following U.S. and foreign Patents: U.S. Patent No.
HEBREW ITALIAN CLASSE 1 PRODOTTO AL LASER DI CLASSE 1 CLASSE 2 LUCE LASER NON FISSARE IL RAGGIO PRODOTTO AL LASER DI CLASSE 2 NORWEGIAN KLASSE 1 LASERPRODUKT, KLASSE 1 KLASSE 2 LASERLYS IKKE STIRR INN I LYSSTRÅLEN LASERPRODUKT, KLASSE 2 PORTUGUESE CLASSE 1 PRODUTO LASER DA CLASSE 1 CLASSE 2 LUZ DE LASER NÃO FIXAR O RAIO LUMINOSO PRODUTO LASER DA
CLASSE 2 SPANISH CLASE 1 PRODUCTO LASER DE LA CLASE 1 CLASE 2 LUZ LASER NO MIRE FIJAMENTE EL HAZ PRODUCTO LASER DE LA CLASE 2 SWEDISH KLASS 1 LASERPRODUKT KLASS 1 KLASS 2 LASERLJUS STIRRA INTE MOT STRÅLEN LASERPRODUKT KLASS 2