
Specifications


G/07171
Version1.6
13/02/2008
WX-5095 Handbook
Commercial In Confidence
6 of 31
2.2 Features
1) True "set and forget" operation. WaveCube X-Stream automatically updates its message content from
the Internet without any user intervention.
2) No software to install or learn. Most installation environments can access the WaveCube
X-Stream by
just connecting it to their Local Area Network then configuring it with a web browser. You'll be running in
minutes.
3) Nothing more to buy. The WaveCube
X-Stream connects straight to your PABX or Telephone system
Music On Hold port and is fully ACMA approved.
4) Multiple message playback from readily-available and inexpensive Secure Digital Cards with up to 1
Gigabyte storage capacity - expandable within seconds.
5) Peace of mind. Automatic confirmation emails advising of unit status and content delivery success.
6) Some features in point form are:
MP3 playback
SD/MMC Card file storage (hot-swappable)
Multi-file support
Auto-Start on power-up
Integrated Ethernet Controller
Web Browser configurable
Automatic checking, up to every minute, of the WaveCube Update Centre for MP3 updates!
Supplied preloaded with superb royalty-free music ready for immediate use
7) Customer premises only requires (within two metres of the
X-Stream):
240Vac Socket Outlet
Ethernet port (broadband Internet connection)
Music On-Hold socket, either RJ12 or 3.5mm phone (mono or stereo)
2.3. WaveCube X-Stream Basic Installation Instructions
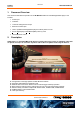
1. Unpack your WaveCube X-Stream and you'll find the X-Stream with an SD Card already inserted into the
slot. The default On-Hold audio track will be pre-loaded. You'll also find a 230Vac/12Vdc Power adaptor, a
two metre Network cable (blue) and an Audio cable with an RJ12 plug on one end and a 3.5 mm mini
(phone) jack on the other end.
2. Plug the 230Vac/12Vdc power adaptor supplied into a working 230V socket outlet and plug the dc plug into
the power socket on the back of the X-Stream. The red power light and the green play light will come on
within five seconds.
3. Plug the network cable supplied into a working LAN socket and into the Ethernet socket on the back of the
X-Stream. The yellow Ethernet LED in the socket will come on and the Ethernet green LED will flash as data
is interchanged. The X-Stream should automatically obtain its IP address from your Router within 60
seconds.
4. Plug the audio cable supplied into the Music on Hold input of your telephone system (refer this to a Telco
technician if necessary) and into the Audio jack at the back of the X-Stream.
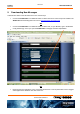
5. Open your Web Browser and enter the X-Stream Browser Configuration Address found on the base of your
X-Stream.
Now follow the 5.1.1 Local Configuration instructions.