
Datasheet


13.3inch HDMI LCD (H)
WORKING WITH RASPBERRY PI
Supports Raspbian/Ubuntu mate/Windows 10 iot Core
When working with Raspberry Pi, you should set the resolution of the LCD by
yourself, or else the LCD screen will not work.
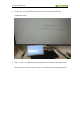
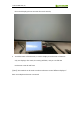
1. Connect 12/1A power adapter to the DC interface of LCD, after connecting the
backlight will light on
2. Download the Raspbian image from Raspberry Pi web site.
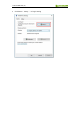
3. Write the image to a TF card and append the following lines to the config.txt file
which is locate in the root of your TF card:
max_usb_current=1
hdmi_group=2
hdmi_mode=82
hdmi_cvt 1920 1080 60 6 0 0 0
You must make sure that there are no spaces on either side of the equal sign.
4. Connect the Touch interface of LCD to USB port of Raspberry Pi
5. Connect HDMI interface of LCD to HDMI port of Raspberry Pi
6. connect the TF card to your Pi then power up.