
User's Guide


Link-IT “User Guide” Page 10
Version 1.03
If for any reason you do not find your tag in the “Auto Detected Tags” list.
• Check that the Reader is installed into a serial COM port.
• Check that the correct COM port is selected in the “Hardware Installation” screen
• Check that the tag is within one meter (3 feet) of the reader.
• Redo the test function in the “Hardware Installation” screen.
If you can still not identify your Tags identity, cancel the installation by pressing “Cancel” and
refer the problem to the distributor from whom you purchased the product.
Add User
The “User Configuration” screen also allows for the registration of additional Users. This
functionality provides for up to 10 additional Users to be registered with User rights only. The
function is intended at allowing Users such as Managers, Secretaries, etc to have access to
your computer. Each of these Users must have their own Link-IT tag. Additional Users are
added by pressing the [Add User] button on the “User Configuration” screen. The above
process must be repeated for each additional User that is to be added to the system. This will
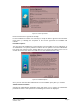
result in the following screen being displayed. See Figure below.
Figure 13: Other User Details
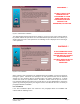
The process of registering additional Users is identical to that of registering the primary User.
This process is repeated below for clarity:
The first step is to type in your “User Name”
The next step is to assign the additional tag ID number to the User Name. This can be
achieved in one of two ways:
1. Type the additional Tag Identity Number into the text box provided for this number. (This
approach is NOT recommended as the relatively large identity number could easily be
typed incorrectly)
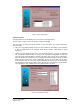
2. Look for the additional tag identity number in the “Auto Detected Tags” list. If no tags are
displayed use the [Back] command button to return to the “Hardware Configuration”
screen and select the [Test] command button. This will read all the tags currently in the
environment. Once the Reader is completed you can simply page forward using the
[Next] command button until you return to the “User Configuration” screen. Once you find
the additional tag in the “Auto Detected Tags” list select this tag by positioning the mouse
cursor on the list entry and press the [left mouse button]. Once so selected press the
[Assign Tag ID] button. The registration is only completed once the [Apply] button is
pressed.
Once the User configuration is complete press the [Next] button to continue the installation.