
Installation guide


SmartSensor 105 User Guide – Wavetronix LLC 9/20/07 - -
6
Installing the SmartSensor
Installing the SmartSensor involves seven simple steps:
1. Attaching the mounting bracket to the pole;
2.
Applying silicon dielectric compound;
3.
Attaching the SmartSensor to the mounting bracket;
4.
Aligning the SmartSensor;
5.
Connecting SmartSensor cable to the SmartSensor;
6.
Connecting SmartSensor to Power and Communication Devices;
7.
Configuring the SmartSensor using SmartSensor Manager™.
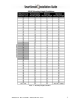
Figure 1 – Detection range of a properly mounted SmartSensor
1. Attaching the Mounting Bracket to the Pole
1. Measure the offset from the first detection lane to the pole as demonstrated in
Figure 1 above.
2. Look up the recommended mounting height from Table 1 on the following page.
NOTE: Depending on the site and type of traffic the sensor may tend to over- or
undercount. If the sensor is over-counting, reduce the height of the sensor by 3
feet and reconfigure the sensor. If the sensor is under-counting, increase the
height of the sensor by 3 feet and reconfigure. Normally, reducing the height of
the sensor improves performance.
3. Strap the mounting bracket to the pole at the specified height using stainless steel
straps.