
User Manual


Wavetronix, LLC SmartSensor 105 User Manual
5
Installing
Physical installation of the SmartSensor
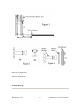
• Choose a location for the sensor to be mounted. The sensor can be mounted on a
vertical or horizontal placed pole or on a flat vertical surface (i.e. wall, billboard,
etc.). It is recommended that the mounting location be a distance 15-22.5 ft from
the nearest point of interest and mounted 20-30 ft above road level as illustrated in
figure 1.
• There are 2 available brackets to choose from. Secure the mounting bracket to the
selected surface facing the desired detection area.
1) Adjustable pole mounting bracket. This bracket can be used on
vertical or horizontal poles and requires three bands to secure it to a
pole. The bracket has 360° of vertical/horizontal adjustability and 70°
of tilt adjustability (figure 2a).
2) Adjustable flat mounting bracket. This bracket can be used on flat
vertical surfaces and requires 4 bolts to secure it to the surface. The
bracket has 70° of tilt adjustability (figure 2b).
• Secure the mounting plate to the bracket with 2 tapered screws (figure 3).
• Secure the SmartSensor to the mounting plate or bracket with five ¼ - 20 screws
(figure 3).
• Aim the front of sensor at the center of the detection area (figure 1 & 3).
• Connect the power/communication cable to the SmartSensor and attach the
modem antenna if applicable.
Sensor cable is must be at least 2 m long or the FCC license is void!