
User's Manual

41
CHAPTer 4 o COMMUNICATION
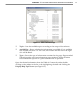
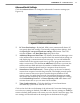
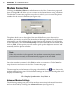
Advanced Modem SettingsFigure 4.5 –
Local Modem Seings –
The initialization string and auto-nd command
can be entered in their respective text elds in the Local Modem Seings
section. The Restore Defaults buon will return these functions to their
default seings. The port number and baud rate will be automatically
detected by SmartSensor Manager, so these seings cannot be changed.
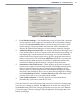
Additional Response Wait Time –
By default, SmartSensor Manager waits
a few milliseconds to receive a response from the sensor before timing out
and displaying a communication error message. You can add additional
milliseconds to the response wait time to give the program more time to
make a connection. Click the Use an additional: check box to activate the
milliseconds text eld and enter the number of additional milliseconds
SmartSensor Manager should wait for a response from the sensor.
SmartSensor Network Protocol –
These options can be used to identify
sensors that are part of a multi-drop network. The Simple protocol option
refers to sensors that are not part of a multi-drop environment. If the
sensor is part of a multi-drop network, SmartSensor Manager can either
auto-detect the multi-drop ID, or you can enter the four-digit ID. Clicking
the Use Multidrop Protocol… Connect Directly to ID: radio buon will
activate the text box so you can enter the ID number.
Time Synchronization –
Click the check box to have SmartSensor
automatically synchronize with the PC clock.
Click the check box near the boom of the Advanced Connection Seings page
to use the new seings as default. The OK buon saves the new seings and
the Cancel buon cancels the changes; both buons return you to the Modem
Connection page. The new seings will be displayed in the message bar at the
boom of the page.