
User's Manual


52
CHAPTer 5 o SENSOR SETTINGS
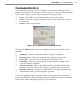
The Identication section information includes the following:
Serial Number –
Shows the 16-digit serial number given to the sensor by
the manufacturer. It can be used to uniquely identify the sensor.
Description –
Shows the 32-character, user-created sensor description as
set using the Sensor Seings screen (for more information, see the Sensor
Seings section later in this chapter). It is used to describe the sensor and/
or the installation site.
Location –
Displays the 32-character, user-created location description as
set using the Sensor Seings screen (for more information, see the Sensor
Seings section later in this chapter). It is used to describe the location of
the sensor.
Sensor ID –
Shows the 4-digit numeric string used to identify the sensor
on a multi-drop network. You can set this ID number using the Sensor
Seings screen (for more information, see the Sensor Seings section later
in this chapter). The SmartSensor Multi-drop protocol uses the sensor ID to
uniquely address sensors on a shared bus.
Serial Interface –
Indicates which of the sensor’s four ports it is using to
communicate. The four ports are RS-232, RS-485, EXP-A, and EXP-B.
Note
The two expansion ports (EXP-A and B) are currently not available for use.
The Firmware Versions section shows on which versions of DSP (Digital Field
Processing) and FPGA (Field Programmable Gain Amplier) the sensor is
operating.
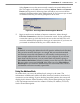
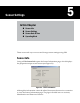
Sensor Settings
You can both view and change certain sensor options and information in the
Sensor Seings page. To access this page, go to Edit>Sensor Seings. If no
sensor connection is active, selecting this will open a directory box, allowing you
to nd SmartSensor conguration (.ssc) les that are saved on your computer.
You can also use this directory box to create a new .ssc le.
The Sensor Seings page is divided into three tabs: General, Communication
and Data Collection. Only the General and Communication tabs will be
discussed here; the Data Collection tab will be discussed in chapter 7.
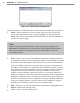
General Tab
The General tab allows you to edit the following seings (see Figure 5.2):