
User's Manual

58
CHAPTer 5 o SENSOR SETTINGS
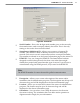
of the screen to save the changes from all three tabs. You can also use these
buons to discard all your changes and return to the old seings.
Save to Sensor –
Saves the changes you’ve just made to the sensor. If you
do not push this buon after making changes, they will be lost when you
navigate away from this page.
Open from Sensor –
Returns all seings to those currently saved on the
sensor.
Save to File –
Saves the seings currently entered in the Sensor Seings
screens to a SmartSensor conguration le (.ssc) on your computer. This
seing can be used to back up your seings; additionally, if you’re not
connected to your sensor, you can change seings, save them to a le, and
use the le to update your sensor once you’re connected again.
Note
Using the Save to File function does not save the changes to your sensor.
If you want to update and then back up your sensor, you need to use both
Save to File and Save to Sensor.
Open from File –
Restores seings from an existing .ssc le. Once the
seings have been restored, you must click Save to Sensor if you want the
sensor updated with the restored seings.
Note
Return to this page to back up your sensor after you’ve completed the steps
to congure your lanes and data collection.
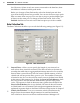
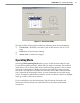
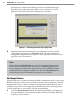
Sensor Date & Time
To ensure that the data collected is timestamped correctly, use the Sensor Date &
Time screen, located at Edit>Sensor Date & Time (see Figure 5.5).
Change the date by selecting the correct date from the drop-down lists (month,
day, and year) or use the calendar to scroll to the correct date. Change the time
by selecting the correct time (hour, minutes, and seconds) from the drop-down
lists.
Click the check box below the calendar to automatically adjust for local computer
time and daylight savings time seings. The check box at the boom of the page
will automatically synchronize sensor to PC UTC time at a certain interval you
can dene in the text eld.