
User's Manual

73
CHAPTer 6 o LANE SETUP
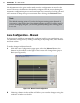
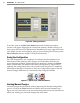
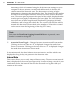
View Interval DataFigure 6.11 –
Before interval data verication is performed, do the following:
Specify the desired interval length in the Interval (Bin) Size edit box. To do 1
this, enable the edit box by pressing Edit, then type the desired length of
the interval in seconds and press Submit. The minimum interval allowed
is ve seconds. If you must cancel your changes, press Cancel and Refresh.
Pressing Refresh buon will restore the current interval length.
Synchronize the sensor time to your computer’s UTC time. This will 2
ensure that intervals will begin and end at the expected time. Intervals are
timestamped at the end of the interval. To synchronize the sensor time,
click the Synchronize icon, which shows two overlapping clocks.
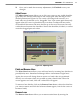
The other two icons near the boom of the page are for logging data:
Turn Interval Data Logging On/O –
Turns event logging on and o.
Click on the icon (it shows a clock and light switch) to toggle the switch on
and o. Once you’ve turned it on, you will be prompted to create a new log
le if there is not already an existing one. Now all of the data shown on the
screen will be wrien to a standard text le that can be viewed at any time.
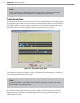
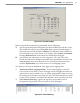
View Interval Data Log –
Opens the log le in a text editor such as
Notepad (see Figure 6.12). The icon shows a clock and paper.
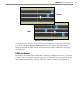
Interval Data LogFigure 6.12 –