WBSn-2400 Outdoor Wi-Fi Base Station Quick Start Guide
Contents Introduction ...................................................................................................... 3 WBSn-2400 Pre-Installation Checklist ............................................................... 3 Installation and Set-up ...................................................................................... 7 Installing the WBSn-2400-S base station...................................................................... 7 Wind Loading Considerations .............................
Introduction This document is intended to help you set up and configure your WBSn-2400-O or WBSn-2400-S base station, using the online Setup wizard. Note: Throughout this document, unless specified otherwise, the use of the product name WBSn-2400 refers to both the WBSn-2400-O and WBSn-2400-S base stations.
Additional equipment and tools required for installation • • • • • Ethernet cable (outdoor CAT5e 4-pair data cable, with RJ45 connectors) Note: Maximum cable length -- 100 meters Ground cable Portable PC Lightning protection 1”-6” diameter pole (on which to mount the unit) Ensure a safe and secure environment Connect the PoE injector to the unit using only a straight Ethernet cable.
Preparing the installation site Only experienced installation professionals who are familiar with local building and safety codes and are licensed, wherever applicable, by the appropriate government regulatory authorities, should install outdoor units and antennas. Warnings How to prepare the site: Grounding best practices, using a data protection device Do not modify the construction of this product.
Grounding best practices, using a data protection device (continued) Grounding outdoors injector by Network Protection Unit Connecting Antennas (for WBSn-2400-O only) Note: The antennas should only be connected once the installation procedure has been successfully completed. How to connect the antennas: Warnings Screw each of the three antennas into the three N-type connectors on the WBSn-2400base station unit. • In order for the WBSn-2400 to work properly, all three antennas must be connected.
Warnings All servicing should be referred to qualified service personnel only. There are no user-serviceable parts inside. Servicing is required when the apparatus has been damaged in any way. This apparatus must be properly grounded. Do not open the unit – risk of electric shock. Any change or modification not expressly described in this manual or approved by the manufacturer could void your authority to operate this equipment.
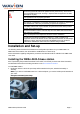
2. Slide the steel bands into the appropriate side slots of the post clamp. Note: For a thinner post, the steel bands should be threaded through the inner slots, and for a wider post, through the outer slots. 3. Attach the post-clamp to the post, and close and tighten the steel bands. 4. If you are installing the WBSn-2400-S on a vertical post, attach the WBSn-2400-S unit to the postclamp, with the screws and washers. Tighten the screws using a ratchet key, set at 13 mm, and proceed to Step 6. 5.
Please also note the following: You must always install an external grounding wire. Make sure you have completed grounding before you connect power to the WBSn-2400. Warnings Note: This is not a mid-span powered device. Do not attempt to daisy-chain PoE devices. National Electrical Codes (NEC) Article 800 requires the use of an Agency Listed (UL/CSA) Building Entrance Protector for all power and communications cables entering a building.
2. A log-in screen is displayed. a. Enter admin in the User Name field. b. Enter admin in the password field. c. Specify the language in which you wish to work. (Note: This field will be fully functional in a future release.) d. Click Connect. The Wavion EMS screen is displayed. 3. Proceed to the IP Management section. Configuration Features IP Management In the GUI, use the System page to set up, configure and manage your IP.
6. Either: Enter the required static IP, and valid static Network Mask, Gateway and DNS parameter values in the relevant parameters. or Enter the DHCP Client Fallback IP Address and Network mask in the relevant parameters. 7. Specify True or False for the Enable management from Wireless Access Interfaces parameter, in order to enable or block a specific wireless device from having management access. The default parameter is True.
Parameter Description BH SSID Indicates whether this SSID is configured as a backhaul SSID. Values: • Enabled • Disabled ACL Group The ACL (Access Control List) controls who can access the VAP. A list is created according to specific parameters, and given a unique name, and will either define an access group (those users permitted VAP access), or a reject group (those users denied VAP access).
Security Mode Authentication Mode Encryption Mode None Open system None WEP • Shared key • • WEP/40 WEP/104 WPA • • PSK (Pre-shared key) Radius • • • TKIP TKIP+WEP/40 TKIP+WEP/104 WPA2 • • • • • PSK (Pre-shared key) Radius Mixed mode PSK Mixed mode Radius Mixed mode PSK + Radius • • AES AES + TKIP Radio configuration (basic) To configure the radio settings, navigate to Configuration => Wireless => Radio.
QoS (Quality of Service) Packet Priority Wireless Multimedia Extensions (WME), also known as Wi-Fi MultiMedia (WMM), provide basic QoS features to IEEE 802.11n networks. WMM prioritizes traffic according to four Access Categories (AC): • Voice • Video • Best Effort • Background Traffic is prioritized by these access categories, and the implementation defined by the WMM standard. Traffic is therefore suitable for applications that require QoS over Wi-Fi, (for example, Voice over IP (VoIP)).
ACS (Online, Offline) The Automatic Channel Selection (ACS) utilizes an embedded algorithm to scan for the best channel with which your base station can work, ensuring optimal capacity, minimal interference and maximum performance. Offline ACS performs a full scan of the available channels while the system is down, determining which channels are the best and most interference-free, and prompting you to choose these channels prior to resuming and reactivating the system .
Glossary Acronym Description 2P Two-Phase or Split Phase 2W Two-Wire 3W Three-Wire AC Alternating Current ANSI American National Standards Institute AWG American Wire Gauge C Celsius CAT Category CCK Complementary Code Keying CFR Code of Federal Regulations CSA Canadian Standard Association dB Decibels dBi Decibels Relative to an Isotropic Radiator DBPSK Differential-Binary Phase-Shift Keying DC Direct Current DQPSK Differential-Quadrature Phase-Shift Keying DSSS Direct-Se
PoE Power over Ethernet RJ45 Registered Jack 45 RSS Received Signal Strength Rx Receive RXD Receive Data TUV Technical Inspection Association Tx Transmit TXD Transmit Data UL Underwriters Laboratories VAC Voltage (Alternating Current) VCCI Voluntary Control Council for Interference VDC Voltage (Direct Current) W Watts WBSn-2400 Quick Start Guide Page 17